Learn To Play Music Blog » LTP Editor https://www.learntoplaymusic.com/blog Sat, 28 Jan 2023 12:37:50 +0000 en-US hourly 1 https://wordpress.org/?v=373 How To Play Guitar Techniques: Vibrato and Bending https://www.learntoplaymusic.com/blog/how-to-play-guitar-techniques-vibrato-bending/ https://www.learntoplaymusic.com/blog/how-to-play-guitar-techniques-vibrato-bending/#comments Fri, 28 Nov 2014 01:06:55 +0000 https://www.learntoplaymusic.com/blog/?p=23198 Techniques for the lead guitarist Have you ever dutifully practiced your scales, as shown to you by a guitar teacher or in a book and wondered what is needed to turn it into real music? […]

The post How To Play Guitar Techniques: Vibrato and Bending appeared first on Learn To Play Music Blog.

]]>
Techniques for the lead guitarist

Have you ever dutifully practiced your scales, as shown to you by a guitar teacher or in a book and wondered what is needed to turn it into real music? Vibrato and bending are two great techniques that will help to bring your guitar playing alive. Think of any accomplished lead guitarist – all of them would use vibrato and bending at some stage, to breathe life and expression into their playing. Let’s have a look at how you can do this too.

What is Vibrato?

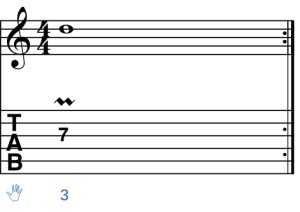
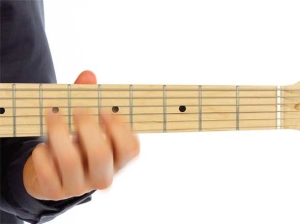
Vibrato is a technique of rapidly moving a note up and down in the direction of the adjacent strings. Vibrato is an important method of sustaining a note once it has been picked. It also gives much more expression to your playing. Vibrato is usually found on long notes, or a note at the end of a phrase. Vibrato is usually obtained by the movement of the wrist away from the neck and back towards the neck, much like turning a doorknob. The symbol for vibrato is a wavy line. Try playing this yourself.

01 02

Bending Notes

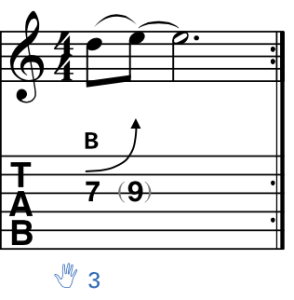
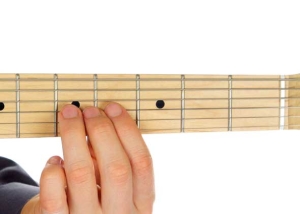
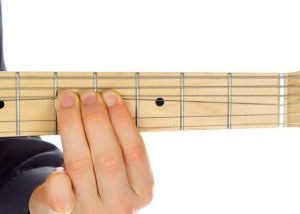
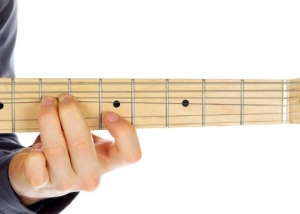
Bending notes is one of the classic sounds of lead guitar. Players such as B.B. King, Buddy Guy, Albert King, Stevie Ray Vaughan, Gary Moore, Joe Satriani, Paul Gilbert and Yngwie Malmsteen are all great note benders. Bending helps to add emotion and intensity to the music as well as giving your playing a more vocal-like quality. A bend is achieved by fretting a note and then pushing the string sideways across the fretboard towards the adjacent strings. One important point with bending notes is to use a supporting finger behind the finger you are using to make the bend. This gives you more strength and better control. When bending notes, it is also helpful to have the thumb of the left hand right up over the edge of the neck to help push back against the pressure of the fingers. The symbol for a bend is a curved arrow accompanied by the symbol “B”. Try the following bend:

03
04  05

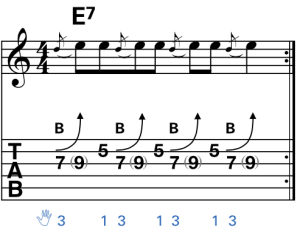
Here is an exercise for developing your ability to bend notes. Make sure you reach the exact pitch you are trying to bend to. In this exercise you are bending from D to E on the third string and then playing another E on the second string. Listen carefully to make sure your bent E note is not sharp or flat. Try recording yourself bending some notes and then listen back to check the pitch of your bends.

06 07

The following lick demonstrates the use of vibrato and bending. Give this a try:

08

Here is the audio recording, so you can hear how it sounds:

You need Flash Player 9 or later installed to play this s3audio

To conclude this blog, try playing the following lick, based upon the C blues scale. Try altering the vibrato as well – making it stronger can inject even more life into your playing. Keep practicing to develop a good ear and feel for these techniques.

09

Here is the audio recording, so you can hear how it sounds:

You need Flash Player 9 or later installed to play this s3audio

We hope you’ve enjoyed this introduction to vibrato and bending. If you are keen to delve further into this and learn some great guitar licks, have a look at the Complete Blues Guitar Manual.

Who is LearnToPlayMusic.com

LearnToPlayMusic.com is the world’s leading music education innovator and publisher of print, eBooks, apps and online lessons.

– Continue learning with Learn To Play Music at LearnToPlayMusic.com

The post How To Play Guitar Techniques: Vibrato and Bending appeared first on Learn To Play Music Blog.

]]>
https://www.learntoplaymusic.com/blog/how-to-play-guitar-techniques-vibrato-bending/feed/ 21
How to Read Music and Scores https://www.learntoplaymusic.com/blog/how-read-music-scores/ https://www.learntoplaymusic.com/blog/how-read-music-scores/#comments Fri, 31 Oct 2014 02:52:02 +0000 https://www.learntoplaymusic.com/blog/?p=22801 Knowing how to read music is a valuable skill for anyone involved in music composition, songwriting, performance, teaching, recording and production. Many instrumentalists are adept at sight-reading, which is the ability to play directly from a […]

The post How to Read Music and Scores appeared first on Learn To Play Music Blog.

]]>
Knowing how to read music is a valuable skill for anyone involved in music composition, songwriting, performance, teaching, recording and production. Many instrumentalists are adept at sight-reading, which is the ability to play directly from a written score. However, a basic-to-intermediate-level reading ability will still help you to grasp the overall structure of a piece, what the key is, its level of complexity, tempo and timing, dynamics and many other musical details. This will allow you to better understand and communicate with other musicians, given you also understand the vocabulary and can follow along with the music.

Once you have the fundamentals down, a great way to learn how to read music is to get hold of some music scores (classical, jazz, and pop scores if possible) and try to follow along with the recordings. This will be easier if you know a musician or teacher who can help you to follow along at first. Scores can be found at traditional music stores and online sheet music retailers. If you’ve never read music before, let’s get started with some basics. The following information comes from Progressive Theory, available online.

The Musical Alphabet

The musical alphabet consists of 7 letters:

15

Each letter represents a music note. These notes are written on a staff, which consists of 5 parallel lines. Notes are written on these lines and in the spaces between them.

01

02

The Treble Staff

A staff with a treble clef written on it is called a treble staff:

03
The notes on the lines and spaces on the staff are named alphabetically as shown below. Each new note is said to be higher or lower in pitch than the one before it or after it.

04
The head of a note indicates its position on the staff, as shown:

05

When the note head is below the middle staff line the stem points upward and when the head is above the middle line the stem points downward. A note placed on the middle line (B) can have its stem pointing either up or down.

Notes on the Treble Staff

07

08

Notes on the Bass Staff

09

The following staff has notes written on the lines and in the spaces of the bass staff in random order. Using a sheet of paper, copy the following notes and write the note name above each one. This will help you to test your note name knowledge, and improve sight reading.

1011

The Grand Staff

When the treble and bass staves are joined together by a line and a bracket, they are called a grand staff. Piano and keyboard music are written on the grand staff.

1213

Bar Lines

In most music, bar lines are drawn across the staff, which divides the music into sections called bars or measures. A double bar line signifies the end of an important section of music, while a final bar line is written at the end of a piece.

14

If you’ve enjoyed this introduction to reading music and would like continue further, we recommend you check out Progressive Theory, available online now.


Who is LearnToPlayMusic.com

LearnToPlayMusic.com is the world’s leading music education innovator and publisher of print, eBooks, apps and online lessons.

– Continue learning with Learn To Play Music at LearnToPlayMusic.com

The post How to Read Music and Scores appeared first on Learn To Play Music Blog.

]]>
https://www.learntoplaymusic.com/blog/how-read-music-scores/feed/ 12
Slap Bass Technique – How to Play Bass https://www.learntoplaymusic.com/blog/slap-bass-technique/ https://www.learntoplaymusic.com/blog/slap-bass-technique/#comments Sun, 26 Oct 2014 21:51:01 +0000 https://www.learntoplaymusic.com/blog/?p=22740 Slap Bass Technique Slap bass is a popular technique often used in funk music, but in reality, it’s just a different way to hit the string. In this article, we’ll give you a few pointers […]

The post Slap Bass Technique – How to Play Bass appeared first on Learn To Play Music Blog.

]]>
Slap Bass Technique

Slap bass is a popular technique often used in funk music, but in reality, it’s just a different way to hit the string. In this article, we’ll give you a few pointers on getting started with slap bass technique, and finish with a more advanced exercise to demonstrate what it sounds like in a musical context. Often just called slap, this style of bass playing involves ‘slapping’ the strings with the right thumb and ‘popping’ with the right hand fingers, giving a percussive characteristic to a note’s sound.

Thumb Slapping Technique

Slap-Technique-01-01  Slap-Technique-01-02

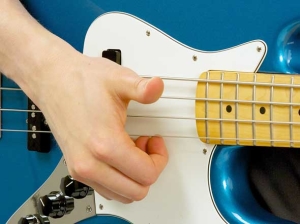
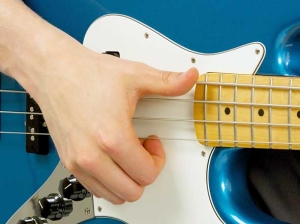
The best way to begin playing this style is to practice slapping the open strings with the knuckle joint on the side of the right thumb, as demonstrated in the following example and shown in the photographs above. The best place to strike the string is right at the end of the fretboard. This allows for a bit of “give” in the string and also forces the string down onto the frets, thus producing the distinctive slap sound. Make sure you strike the string clearly and then let your thumb rebound up off the string like a drum stick rebounding off a drum. If you leave your thumb in contact with the string, it will deaden the sound and none of the notes will be clear. Notes slapped with the thumb are indicated by the letter T (meaning thumb) written above or below the note. Try the following exercises, which can all be found in Beginner Slap Bass.

11871-00100

Left Hand Damping

As you strike each string with the thumb, be sure to damp the other strings with your left hand by laying your fingers lightly across the strings. In slap playing, damping out the sounds you don’t want is as important as sounding the notes you do want.

Listen carefully to your playing to make sure there are no unwanted notes ringing. If you do hear any, analyze which strings they are coming from and practice damping them out with your left hand. A good way to get used to left hand damping is to play a quarter note on the first and third beats of the bar and damp the string on the second and fourth beats (indicated by quarter rests) as shown in the following example.

11871-00200

Popping Technique

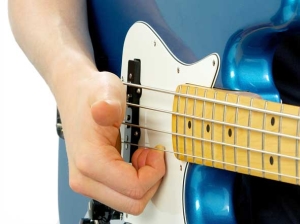
Apart from thumb slapping, the other essential part of the slap bass style is the use of the finger popping technique. This technique is usually done with the index finger (i) but the middle finger (m) is also sometimes used. The technique is performed by putting the end of the finger slightly under the string and then pulling it upwards and away, allowing the string to snap back against the fretboard, thus producing the popping sound. A combination of arm and wrist rotation is used to achieve this technique.

Popping-Technique-01  Popping-Technique-02

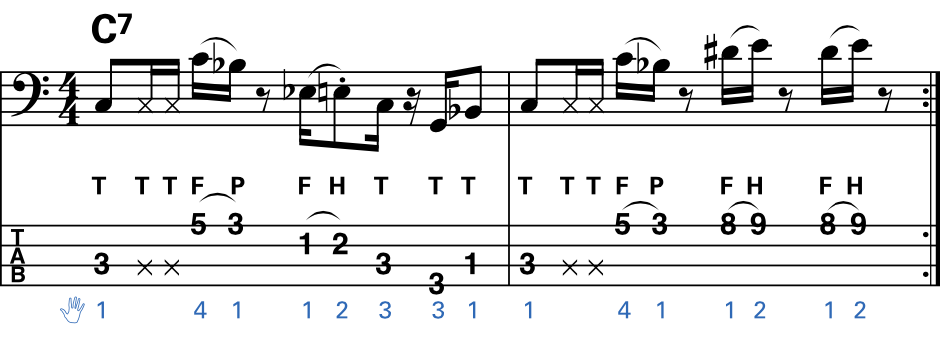
Study the photos and practice this technique in the following exercises. The popping technique is indicated in the notation by the letter F written above or below the note. To begin with, try popping the open G and D strings, as shown.

11871-02600

The next step is to combine the slapping and popping techniques. Take this slowly at first and use a metronome to make sure you are keeping good time.

11871-02700

And finally, here is a more advanced example of slap bass, to give you a taste of where you can go with this style. If you’re keen to pursue slap bass playing, have a look at Beginner Slap Bass.

11871-09100

You can watch the video for the exercise below, to see and hear how it should sound.


Who is LearnToPlayMusic.com

LearnToPlayMusic.com is the world’s leading music education innovator and publisher of print, eBooks, apps and online lessons.

– Continue learning with Learn To Play Music at LearnToPlayMusic.com

The post Slap Bass Technique – How to Play Bass appeared first on Learn To Play Music Blog.

]]>
https://www.learntoplaymusic.com/blog/slap-bass-technique/feed/ 3
Shred Guitar: The Art of Blazing Fretboards https://www.learntoplaymusic.com/blog/shred-guitar-blazing-fretboards/ https://www.learntoplaymusic.com/blog/shred-guitar-blazing-fretboards/#comments Tue, 21 Oct 2014 02:00:15 +0000 https://www.learntoplaymusic.com/blog/?p=22436 What is Shred Guitar? Let it be said that there is a certain mystique to the art of guitar shred. Indeed, the shred guitarist in top form appears to transcend mere mortals, to the realm […]

The post Shred Guitar: The Art of Blazing Fretboards appeared first on Learn To Play Music Blog.

]]>
What is Shred Guitar?

Let it be said that there is a certain mystique to the art of guitar shred. Indeed, the shred guitarist in top form appears to transcend mere mortals, to the realm of the demigods. Think blindingly fast, accurate, over-the-top, virtuoso guitar playing… and that should get you somewhere in the ballpark. Ladies and gents, shred guitar is not for the faint-hearted; neither is it a style of music but more a way of playing the instrument and showing off advanced guitar skills. Most shred guitarists play using an electric guitar with distortion and high-gain. Mention the word ‘shred’ though, and most musicians will think of some form of metal oriented music, as this is where you’ll most often encounter it. But you can shred on an acoustic too.

A Brief Overview of Shred Guitar

During the 1980s, this style of playing reached its peak. Guitarists such as Eddie Van Halen, Yngwie Malmsteen, Jason Becker, Michael Angelo Batio, Paul Gilbert, Joe Satriani, Steve Vai and John Petrucci burst onto the professional music scene with a level of precision guitar playing never-before-seen in heavy rock and metal. It is most popular in metal, jazz-fusion and other progressive/technical music. This approach to guitar playing relies strongly upon alternate picking, sweep picking, finger tapping and palm muting.

Why Shred Guitar?

Whether or not you identify with the guitarists mentioned, or with hair-metal bands of the ‘80s, or a simple mention of the word “shred” strikes fear into your heart – there is actually great benefit to having this ability. Think about it – being able to play fast and accurately all over your instrument requires some serious technique, not to mention a thorough working knowledge of scales and modes. You don’t even need to play this way when performing either – shred guitar serves as great practice.

Whatever style of music you’re into, if you play lead guitar, there can be no harm in at least developing your technique and fretboard knowledge to a high level. In fact you’ll have a freedom on your instrument that few have and will be far more versatile in your playing. A word of a warning – many an intrepid guitarist has ventured into the unchartered waters of shred, only to emerge with a new-found love for high-level playing. In other words, you might find yourself becoming a metal musician, or jazz, or country-bluegrass player! Can’t let all that hard work go to waste.

Getting Started with Shred Guitar

So you want to be able to shred with the best of them? Understand that it won’t happen overnight – this will require commitment. Here’s what you’ll need to get a good start:

  1. Learn all 7 mode patterns on the fretboard and how they link together, creating one master pattern. It will be important to be able to distinguish between the specific modal patterns later on.
  2. Learn all 5 pentatonic patterns and how they link to form a master pattern.
  3. Develop your alternate picking technique, through the use of picking exercises, which incorporate long scale-runs and string skipping. If you are new to picking, it is advisable to find a reputable guitar teacher who can correct any bad habits you may be forming. It is vital that you develop a relaxed and fluid picking technique, as well as fretting technique.
  4. Get a metronome. This is available as a standalone device or a smartphone app.
  5. Practice technique exercises which employ a range of scales and licks, across the entire fretboard, using a metronome as often as you can. Start very slowly and be militant about picking each note cleanly. Your aim is cleanliness and accuracy.
  6. Practice frequently and practice well. Set goals, understand what you’re aiming for and critically assess your technique and sound while practicing.
  7. Be patient. It may take a year or two of solid practice each day. Find a good teacher who can help you stay focused.
  8. Listen to music with shred guitar in it – allow yourself to enjoy it and be inspired.

Shred Guitar Exercises

To conclude this article, here are a few shred guitar exercises you may wish to try. These can be found in Beginner Metal Guitar.

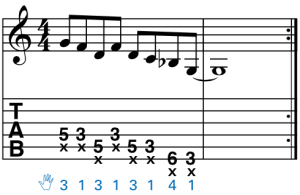
From Beginner Metal Guitar, Lesson 6, Exs 64. This exercise makes uses of palm muting.

11880_06400

Here is the video for this example:


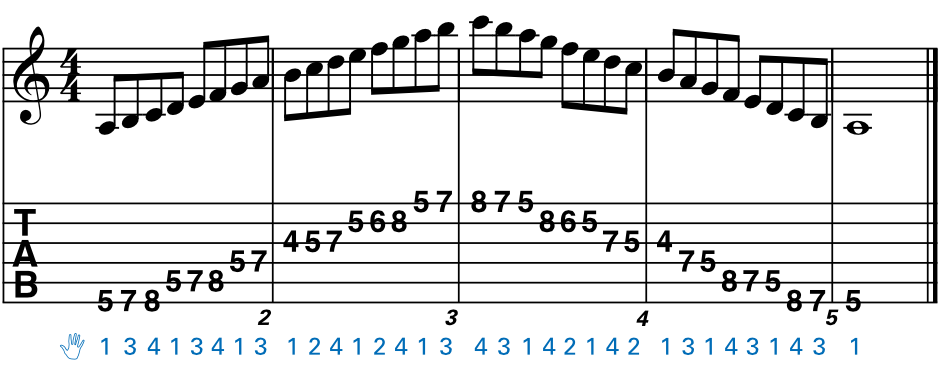
From Beginner Metal Guitar, Lesson 7, Exs 75 – This exercise makes use of the Natural Minor Scale (Aeolian Mode), one of the 7 modes.

11880-07500

Here is the video for this example:


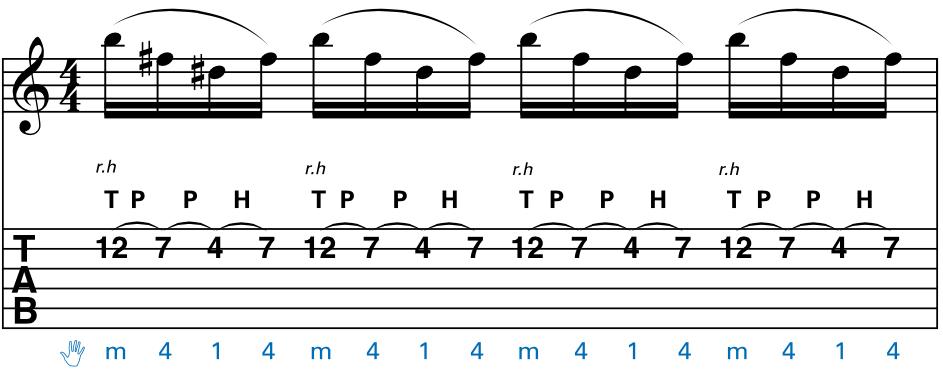
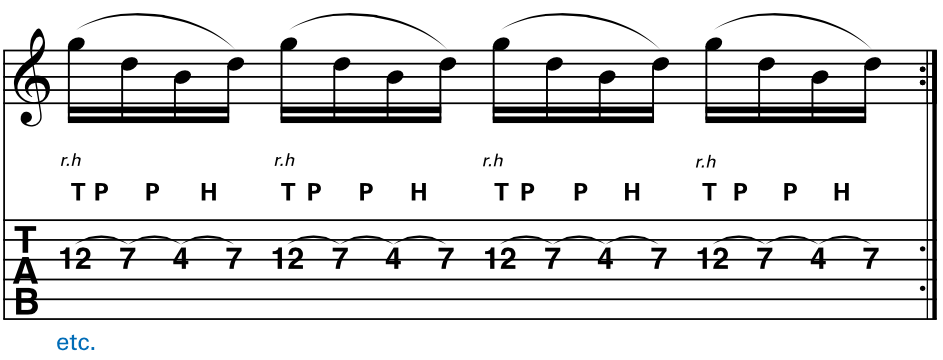
From Beginner Metal Guitar, Lesson 9, Exs 105 – This exercise makes use of tapping, pull-offs and hammer-ons.

11880-10500_1 11880-10500_2

Here is the video for this example:

Further Guitar Shred Information

If you found this article interesting and would like further information and insights, definitely check out Music Space Episode 12: Guitar Shredding with David Dowling.

Who is LearnToPlayMusic.com

LearnToPlayMusic.com is the world’s leading music education innovator and publisher of print, eBooks, apps and online lessons.

– Continue learning with Learn To Play Music at LearnToPlayMusic.com

The post Shred Guitar: The Art of Blazing Fretboards appeared first on Learn To Play Music Blog.

]]>
https://www.learntoplaymusic.com/blog/shred-guitar-blazing-fretboards/feed/ 3
How to Play Guitar Chords: Tips on Getting a Good Sound https://www.learntoplaymusic.com/blog/play-guitar-chords-tips-getting-good-sound/ https://www.learntoplaymusic.com/blog/play-guitar-chords-tips-getting-good-sound/#comments Thu, 16 Oct 2014 00:00:09 +0000 https://www.learntoplaymusic.com/blog/?p=22370 How To Make Ordinary Guitar Chords Sound Great Picture yourself in this scenario: You’ve been learning guitar for a few months and you’re sitting in a room on a cold, bleak day holding a cheap acoustic […]

The post How to Play Guitar Chords: Tips on Getting a Good Sound appeared first on Learn To Play Music Blog.

]]>
How To Make Ordinary Guitar Chords Sound Great

Picture yourself in this scenario: You’ve been learning guitar for a few months and you’re sitting in a room on a cold, bleak day holding a cheap acoustic guitar with old strings that are too high above the fretboard. It’s literally painful to play and the resulting sound is hardly inspiring. Hopefully it’s all “up” from here? It certainly can be!

In an ideal world, here’s what you can do:

  1. Invest in a good electronic tuner and make sure the guitar is well tuned. Tuners can be bought as a standalone device from music stores, or as a smartphone app. We recommend Cleartune, by BitCount (Android/iOS). Make it a priority to keep your guitar in tune and listen carefully to it. If a string sounds even slightly out of tune, question it and double check.
  2. Invest in a better instrument. Cheap guitars and older instruments have poor intonation and will not tune well, no matter how good you are. Understandably, it is not always easy for those on a budget, however even a reasonably affordable, brand new instrument will be a worthwhile upgrade, provided it is not bought from a bargain bin, second-hand, or as part of a cheap guitar package.
  3. If your strings are too high above the fretboard (this distance is called ‘action’) then consider having your instrument adjusted professionally at a guitar repair/servicing store. This will make the guitar much more comfortable to fret notes and play.

acoustic_chords

Upgrade Your Guitar Chords Technique!

Granted, practice is a big part of what learning the guitar is about. However, if you have been playing for a few years and are still not satisfied with the sounds you’re getting then make sure you’re observing the following:

  1. Make sure your fretting fingers are placed just behind the fret for each note of the chord.
  2. Place just enough pressure on the string to avoid buzzing. Too much pressure can cause the string to go slightly sharp and you’ll sound out of tune.
  3. Many guitarists make the mistake of not listening to every note of the chord. Play each note individually before strumming, to be sure they can be heard. The more you do this, the more your fretting hand will find the optimal position for each finger and you’ll build muscle-memory.
  4. Use a heavy pick. A heavier pick will encourage better technique, greater volume and fuller tone, since it gives more resistance against each string. This forces your strumming/ picking hand to use greater accuracy when strumming & picking. The thickness of the pick will allow for greater volume, while your tone will not sound thin or “plastic-y” as is common with light picks.
  5. Your strumming hand should use wrist-motion, not arm-motion. You’ll be able to play faster and gain greater control this way.
  6. Practice strumming the guitar quietly and loudly. When playing in general, strum moderately loud, so that you’re projecting well.
  7. Strum gently, but consistently. Smoothly brush the pick across the strings, but not too slowly. Avoid digging in and ‘crunching’ them together or creating so much movement that the strings vibrate against the fretboard. With practice, a gentle but consistent strumming motion can still generate decent volume, so don’t be concerned that it won’t be loud enough. This will ease tension on your muscles as well.

Guitar Chords to Try!

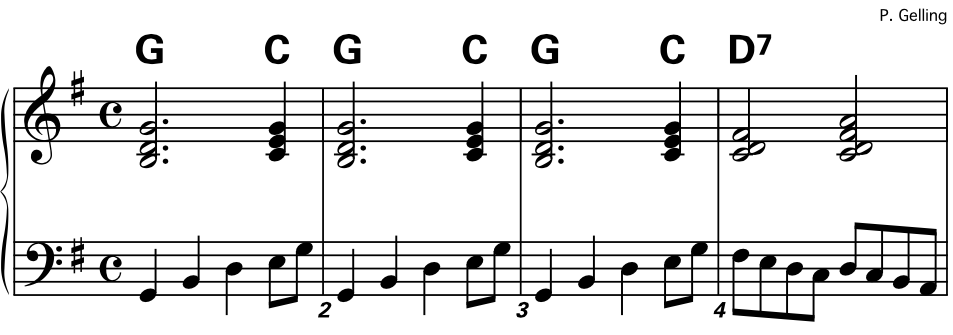
Let’s take a simple chord progression like this:

69069-04500

Here are a few ways to make this progression sound sweet to the ears. Use open guitar chords for this exercise.

  1. Bar 1 – strum the G chord, observing all that was said above in the Technique section. It should be sounding bright, loud and clear.
  2. Do the same for the Em chord. When you reach C, make sure you strum only the top 5 strings. It will sound much cleaner than strumming all six strings, as the bass note of the chord will be a C (the same as the chord name) rather than an E. To help you achieve this, place your third finger (which is currently on the lowest note of the C chord) in a position where it slightly mutes the bottom string. The edge of your fingertip need only touch the bottom string to do this.
  3. Lastly play the D7 chord on the top 4 strings only, using the same root-note principle as with the C chord. It would be possible to play the 5th string as well and still have a regular D7 chord, but because the lowest note is then an A instead of D, the chord is not as clean and defined. Practice strumming only the top 4 strings.

Where To From Here?

Contrary to what you might think, the open chords (within the first 5 frets) are some of the best sounding chords you will ever learn. The famous American guitarist Chet Atkins once joked, “Don’t play above the fifth fret… there’s no money there.” The open chords do have a particularly strong sound to them and are well suited to sustained rhythm playing and fingerpicking. Here are some more ways this progression can be brought to life:

  1. Using a pick, slowly and evenly play the lowest note of each chord (G, E, C and D respectively) followed by the top 3 strings, in the order of 3, 2, 1, 2, 3, repeated twice in each bar. For example, the first chord would be played as low G (6th string) followed by strings 3, 2, 1, 2, 3. Repeat that chord before moving to low E, followed by 3, 2, 1, 2, 3 etc. Make sure each note is loud and clear. It should create a nice arpeggio effect.
  2. Pick each note loud and clear and let them ring as long as you can before the next chord change. This can be used to add dramatic effect on ballads and fingerpicked music.
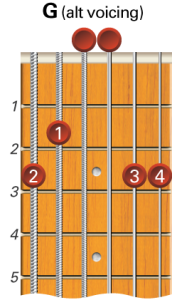
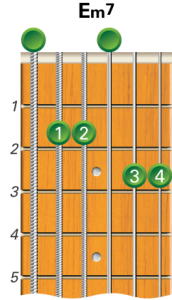
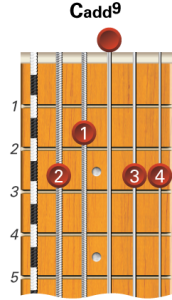
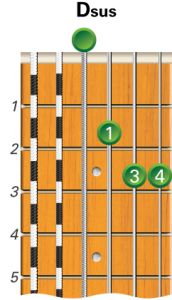
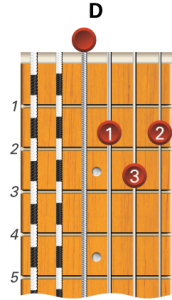
  3. Try different voicings of these chords, such as the ones suggested below. Over time you’ll learn more voicings and substitutions which can spice up a chord progression. Try the following, using the same picking pattern:

69069-04500_alt

G-alt-voicingEm7Cadd9DsusD


Who is LearnToPlayMusic.com

LearnToPlayMusic.com is the world’s leading music education innovator and publisher of print, eBooks, apps and online lessons.

– Continue learning with Learn To Play Music at LearnToPlayMusic.com

The post How to Play Guitar Chords: Tips on Getting a Good Sound appeared first on Learn To Play Music Blog.

]]>
https://www.learntoplaymusic.com/blog/play-guitar-chords-tips-getting-good-sound/feed/ 14
Why You Should Learn to Play the Tin Whistle https://www.learntoplaymusic.com/blog/learn-play-tin-whistle/ https://www.learntoplaymusic.com/blog/learn-play-tin-whistle/#comments Tue, 14 Oct 2014 05:33:49 +0000 https://www.learntoplaymusic.com/blog/?p=22636 Why Should I Learn to Play the Tin Whistle? Ever thought about playing an instrument? Sure, there are common-place instruments such as the piano, guitar, drums and vocals… but why not look at something a […]

The post Why You Should Learn to Play the Tin Whistle appeared first on Learn To Play Music Blog.

]]>
Why Should I Learn to Play the Tin Whistle?

Ever thought about playing an instrument? Sure, there are common-place instruments such as the piano, guitar, drums and vocals… but why not look at something a little different such as the Tin Whistle? The tin whistle is a woodwind instrument, containing six holes and is relatively easy to play. It is often heard in celtic and folk music. If this instrument sounds like it’s for you, here’s how you can get started in this post.

Choosing the Correct Tin Whistle

Make sure you have a tin whistle tuned in the key of D, (your tin whistle should have the letter D written on it). This is the most common type of tin whistle. If you are unsure about whether your whistle is tuned to D, check with the staff at your local music store.

How to Hold The Tin Whistle

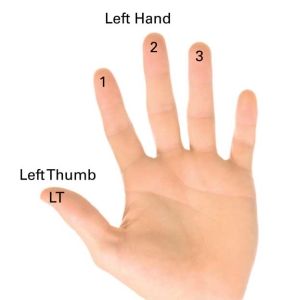
There are six holes on the tin whistle. The first three fingers of each hand are used to cover the holes. The little fingers are not used by either hand. Different notes are produced by covering various combinations of these holes as you blow through the instrument. The following photo demonstrates the basic playing position. Notice that the left hand is above the right.

Female-Playing-Front-01

Understanding the Tin Whistle Diagrams

The numbers on the fingers show which fingers should be used to cover the holes as demonstrated in the previous photo.

69262-005-bv01-en-us69262-005-bv02-en-us

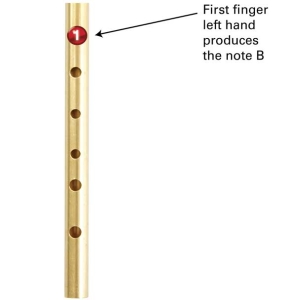
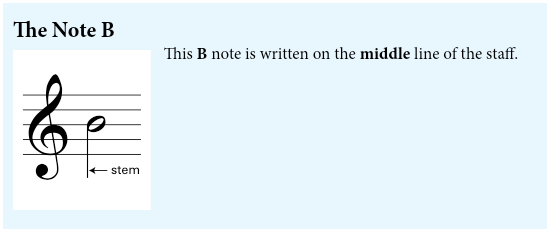
The following photo shows a B note. This is produced by covering the top hole with the first finger of your left hand. In the photo this is indicated by a white number inside a red circle, covering the hole. The notation for this note is shown further below.

69262-005-bv03-en-us

Playing Your First Note on the Tin Whistle

The first note you will learn to play is the B note, shown above. Place your fingers in position to play the note and put the tip of the mouthpiece into your mouth. Use your lips to seal off any air from escaping out the sides of your mouth and blow smoothly and steadily into the tin whistle. Don’t blow too hard or start the note too suddenly, or you may cause the note to sound at the wrong pitch or cause the instrument to squeak.

Tonguing

To control the beginning and end of a note, the technique of tonguing is used. To prepare for this technique whisper the sound “taa”. The sound begins with your tongue sitting behind your top teeth, blocking the passage of air, and you make the “taa” sound by quickly withdrawing it, letting a stream of air begin from your outgoing breath.

The next step is to practice this with the tin whistle in position to play a B note, with your tongue lightly on the hole in the mouthpiece. As you withdraw your tongue, the note will have a well articulated beginning. The “t” part of the sound gives the note a definite starting point, and the “aa” part of the sound keeps your throat open so that the flow of air remains constant and the note sounds even. To end the note, you put your tongue back on the mouthpiece rather than stopping your breath. This will end the note as crisply as it started. It is worth practicing the tonguing technique many times on a single note until you are comfortable with it.

the_note_b

Breathing technique When Playing the Tin Whistle

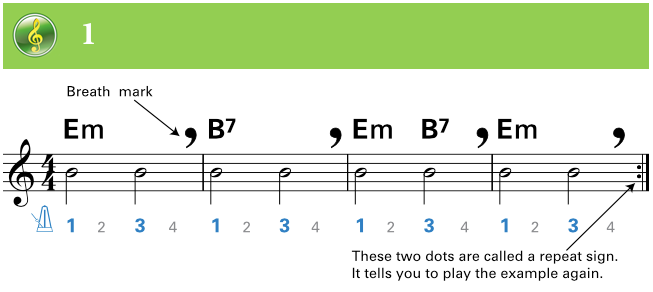
When learning any wind instrument, it is important to learn how to take a new breath without losing your timing. Breath marks are indicated in the following exercise by the large comma-shaped symbol. Take a quick, deep breath, and be careful not to lose your timing when you breathe. Counting as you play should help you become more confident with this. The correct breathing technique is discussed in detail in Lesson 6 of our Progressive Tin Whistle book.

If you look at the following example, you will notice a line of letters and symbols above the staff (Em, B7, Em, etc.) These are chord symbols which indicate the harmony to be played by accompanying instruments such as keyboard or guitar. The chord symbols do not affect the notes you play on the tin whistle. You will also notice the counting numbers underneath the staff. The bigger bold numbers tell you to play a note and the smaller numbers tell you to sustain it until the next note.

69262_exs_01

Listen to this audio example to hear how the exercise above should be played. Once you’re confident, try playing along with the backing track supplied beneath it.

You need Flash Player 9 or later installed to play this s3audio

Audio – Full Mix

You need Flash Player 9 or later installed to play this s3audio

Audio – Backing Mix

We hope you have enjoyed this short introduction to the tin whistle. Wishing you well, whichever instrument you should choose to learn!


Who is LearnToPlayMusic.com

LearnToPlayMusic.com is the world’s leading music education innovator and publisher of print, eBooks, apps and online lessons.

– Continue learning with Learn To Play Music at LearnToPlayMusic.com

The post Why You Should Learn to Play the Tin Whistle appeared first on Learn To Play Music Blog.

]]>
https://www.learntoplaymusic.com/blog/learn-play-tin-whistle/feed/ 2
All About the Electric Acoustic Guitar https://www.learntoplaymusic.com/blog/electric-acoustic-guitar/ https://www.learntoplaymusic.com/blog/electric-acoustic-guitar/#comments Thu, 09 Oct 2014 06:03:43 +0000 https://www.learntoplaymusic.com/blog/?p=22358 What is an Electric Acoustic Guitar? An electric acoustic guitar is any standard acoustic guitar that includes a pickup system or on-board microphone. This allows the guitar to be connected to an amplifier and therefore […]

The post All About the Electric Acoustic Guitar appeared first on Learn To Play Music Blog.

]]>
What is an Electric Acoustic Guitar?

An electric acoustic guitar is any standard acoustic guitar that includes a pickup system or on-board microphone. This allows the guitar to be connected to an amplifier and therefore played through a speaker or PA system.

Why Use an Electric Acoustic Guitar?

Whether you play a classical guitar with nylon strings or a full-sized, steel-string instrument or something in between, any acoustic guitar can be fitted with a pickup system if needed. The advantage of using an electric acoustic may seem obvious; the ability to amplify your instrument without the need for a separate microphone. So why else might you consider using an electric acoustic? The answer is versatility and consistency.

With a pickup system built in to your instrument, the guitar can be plugged directly into an amplifier or mixing console. Using the guitar in this manner enables a consistent tonal output from the instrument, making it easier to control in live situations. This is very helpful if you are touring, since you might not always have adequate time to tweak the sound of a separate microphone before the show.

The use of a regular microphone would also need to factor in the microphone type (e.g., condenser, dynamic), microphone brand, polar pattern and positioning, small movements by the guitarist which affect the sound, amount of gain achievable before feedback, not to mention bleed from other acoustic sources on stage. It is certainly possible to get a great, if not better sound with a good microphone and positioning, plus a venue with a decent PA system and acoustics. However with a pickup system, you have the freedom to move around on stage, plus the sound of the guitar’s pickup output is easier to control at higher volumes, so it is much more practical.

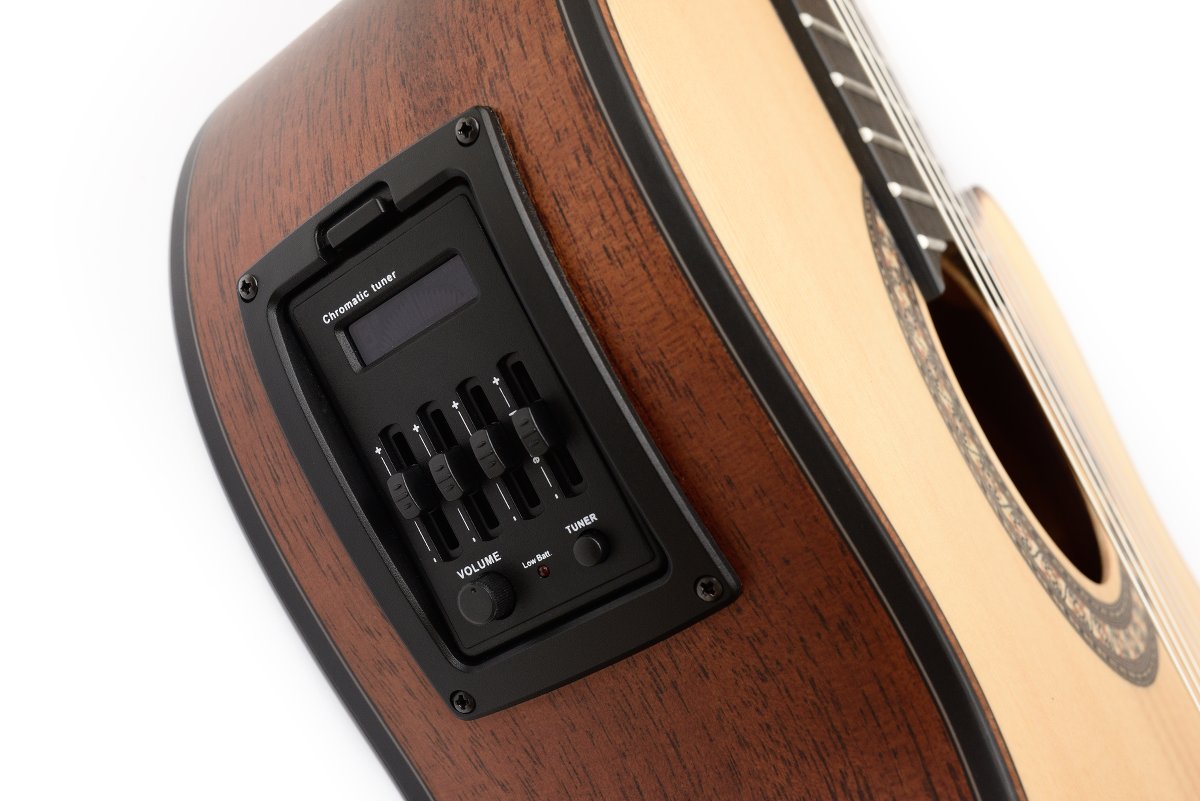
acoustic_pickup_controls

Types of Pickup Systems

There are 3 main ways to amplify your acoustic guitar without the use of a regular microphone. The most common method is to use a piezo-electric transducer, which sits under the saddle of the strings, at the bridge. This requires an on-board preamp and power source, typically from a 9V battery. A second method is to use a regular magnetic bar-shaped pickup (similar to an electric guitar pickup) which is designed to mount under the strings, at the soundhole. This is very easy, since it requires no alteration to the guitar. The third method is to install a small electret condenser microphone inside the guitar. Manufacturers also offer combination pickup units, such as the Maton AP-5 Pro, which includes a piezo under-saddle unit and an internal mic, or the Seymour Duncan Mag Mic which combines a magnetic pickup with an internal mic. Nowadays, acoustic players will often customize their guitars to get a blend of two or even three of these pickup types, which means the guitar itself will have multiple outputs.

acoustic_cable

Issues To Be Aware Of

Guitars fitted with a preamp system require power, normally from a 9V battery. The battery doesn’t need replacing very often, but it’s a good idea to carry a spare just in case.

Secondly, the natural tone of your guitar will be compromised a little by most direct pickup systems. This is considered a small price to pay for the advantages of using one in live situations, however in the recording studio it is a common practice to mic the instrument as well as record the pickup output (through a D.I. box), giving the engineer several options for recording the best possible sound.

At higher volumes, feedback can also become an issue, regardless of whether you use a pickup or a microphone. If relying on a pickup, you can help reduce the problem by using a feedback buster, which is essentially a rubber plug that fits into the soundhole.

Choosing an Acoustic Pickup

There is no easy answer to this, as it depends on how you play, what kind of acoustic guitar you have and what kind of sound you’re after. Do some research online, including watching and listening to video demonstrations of pickups. Here’s our recommendation: if you are considering an upgrade and already own a great acoustic guitar that you have no plans on retiring, then it would be worthwhile having a pickup system fitted to that instrument. If you have an average or below-average instrument, consider purchasing an electric acoustic, as the pickups will be factory-installed, tested and optimized for that instrument. When testing an electric acoustic guitar, listen carefully – does the amplified sound clearly resemble a bigger, louder version of what is coming from the soundhole? For most people that should be the aim – a louder, but natural sound. To get you started in your research, some well known acoustic pickup manufacturers include Maton Guitars, Seymour Duncan, Fishman, B-Band and LR Baggs.


Who is LearnToPlayMusic.com

LearnToPlayMusic.com is the world’s leading music education innovator and publisher of print, eBooks, apps and online lessons.

– Continue learning with Learn To Play Music at LearnToPlayMusic.com

The post All About the Electric Acoustic Guitar appeared first on Learn To Play Music Blog.

]]>
https://www.learntoplaymusic.com/blog/electric-acoustic-guitar/feed/ 18
Upgrading Your Electric Guitar Pickups: Pros and Cons https://www.learntoplaymusic.com/blog/upgrading-electric-guitar-pickups-pros-cons/ https://www.learntoplaymusic.com/blog/upgrading-electric-guitar-pickups-pros-cons/#comments Tue, 07 Oct 2014 06:10:54 +0000 https://www.learntoplaymusic.com/blog/?p=22204 Why Change or Upgrade Your Guitar Pickups? Most guitar players will probably never feel the need to change pickups, and this is fine. However an experienced player who is looking for specific tones will certainly find it worthwhile. A […]

The post Upgrading Your Electric Guitar Pickups: Pros and Cons appeared first on Learn To Play Music Blog.

]]>
Why Change or Upgrade Your Guitar Pickups?

Most guitar players will probably never feel the need to change pickups, and this is fine. However an experienced player who is looking for specific tones will certainly find it worthwhile. A guitarist’s tone is largely the result of what their fingers are doing and how they physically play their instrument. However, pickup choices do have some bearing, as do the amplifier and the guitar itself. Pickup manufacturers normally provide a description of each pickup in their catalog, and most now have recorded samples online.

What are Guitar Pickups?

Guitar pickups are essentially a microphone which responds to the vibration of strings by converting the acoustic energy they create into an electrical signal, which is then sent to an amplifier. On any electric guitar the pickup is mounted under the strings, between the bridge and the start of the fretboard.

Types of Guitar Pickups

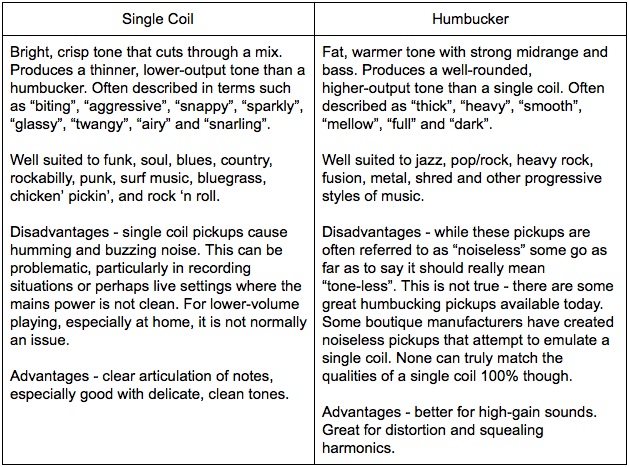
The two main kinds of electric guitar pickup you’ll encounter are the single coil and the humbucker. There are numerous guitar pickup manufacturers out there and literally hundreds of pickups on the market – all of which are based upon these two designs. Much could be said about the differences between them, such as the magnetic materials used, the wiring, number of windings and spacing, but for simplicity we’ll focus on the practical differences to be aware of. One major difference is that single coil pickups create electrical noise, because they act like a small antenna and are susceptible to mains interference and radio. A humbucking design avoids this problem, hence the term hum-bucker. The main defining features of each guitar pickup are listed in the table below:

Guitar Pickups: Single Coil vs Humbucker

Guitar Pickup Configurations

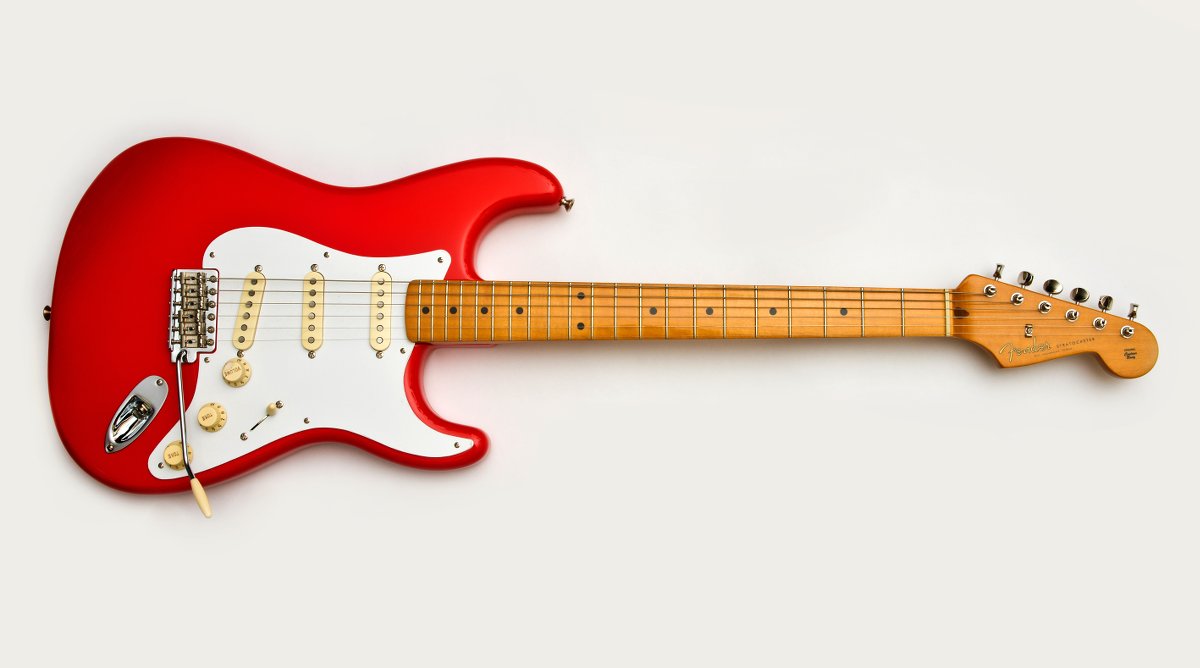
Electric guitars can come with a mix of humbuckers and single coils or simply one type. This is called the pickup configuration. Famous guitars such as the Fender Stratocaster (shown below) come with 3 single coil pickups as standard (S-S-S). The Gibson Les Paul comes with two humbuckers (H-H).

strat guitar pickups

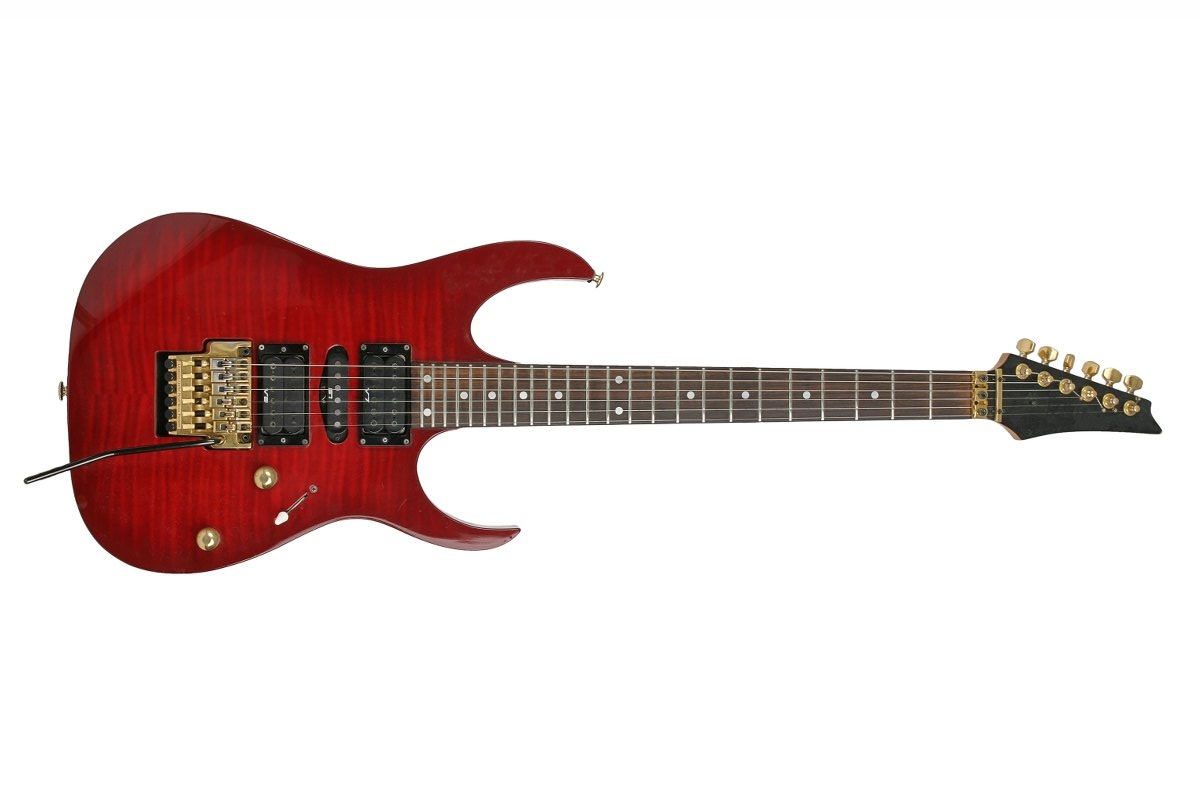
Dozens of modern guitars are based upon a ‘Superstrat’ design, which often uses an S-S-H configuration. This means a single coil for the neck and middle, and a humbucker in the bridge. The Blade RH-4 by Gary Levinson uses ‘stacked coil’ pickups for the neck and middle (these are humbucking designs but look and sound more like a single coil), and a humbucker for the bridge. An S-S-H configuration allows for a combination of traditional stratocaster sounds and modern distorted tones on the same guitar. The Ibanez RG and JEM series (as shown below) mostly use a H-S-H configuration, giving two fat humbucker tones for the neck and bridge sound, while also allowing for a single coil middle-pickup tone, ideal for rhythm playing.

ibanez guitar pickups

In Conclusion

So why would someone want to upgrade a pickup? One reason is that cheaper pickups (e.g., stock pickups in cheaper instruments) can lack clarity, particularly with distorted tones. Even if your technique is good, the resulting sound may have a certain muddiness to it. Cheaper pickups also sometimes have a “woolly,” or hollow bass response, while better ones tend to be focused and retain clarity. Better pickups will often emphasize harmonics more, and give a pleasant, even sound to chords and lead playing. Many pickups are popular because of the qualities they possess, including the Seymour Duncan Alnico II Pro, EMG-81, and DiMarzio PAF-Pro. You may already have a great guitar with humbuckers but would prefer a single coil tone, or perhaps want to upgrade a humbucker to one that has a brighter tone. Or maybe the style of music you play could benefit from higher-output pickups? You could also be searching for a “sound” or trying to emulate the tone of your favorite artist. Finding out what pickups they use and switching over is one step you can take. The possibilites are endless.

Popular pickup manufacturers include Seymour Duncan, EMG, DiMarzio, Lace, Bill Lawrence, Lindy Fralin, Bartolini, Kinman, Joe Barden, Bareknuckle, Lollar, Fender and Gibson. Check them out if you have opportunity – a world of tone awaits you!

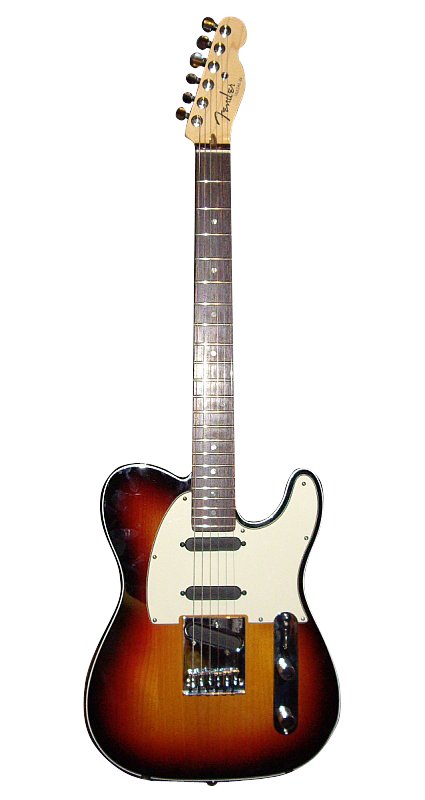
tele_01tele_02

A stock Fender Telecaster guitar (left) and the same instrument with modified pickups added (right).


Who is LearnToPlayMusic.com

LearnToPlayMusic.com is the world’s leading music education innovator and publisher of print, eBooks, apps and online lessons.

– Continue learning with Learn To Play Music at LearnToPlayMusic.com

The post Upgrading Your Electric Guitar Pickups: Pros and Cons appeared first on Learn To Play Music Blog.

]]>
https://www.learntoplaymusic.com/blog/upgrading-electric-guitar-pickups-pros-cons/feed/ 5
Piano Tips: Improving Piano Hand Coordination https://www.learntoplaymusic.com/blog/piano-tips-improving-piano-hand-coordination/ https://www.learntoplaymusic.com/blog/piano-tips-improving-piano-hand-coordination/#comments Tue, 07 Oct 2014 01:17:04 +0000 https://www.learntoplaymusic.com/blog/?p=22280 Piano Tips for Improving Piano Hand Coordination Today’s post looks at piano tips for improving piano hand coordination, including how to practice scales, playing with each hand individually and then playing with both hands together. […]

The post Piano Tips: Improving Piano Hand Coordination appeared first on Learn To Play Music Blog.

]]>
Piano Tips for Improving Piano Hand Coordination

Today’s post looks at piano tips for improving piano hand coordination, including how to practice scales, playing with each hand individually and then playing with both hands together.

Practicing Piano Scales

As a piano player, it is essential to be able to play both single notes and chords equally well with both hands. A good way of developing strength and independence in all the fingers is to practice scales with each hand and then with both hands together. Various ways of playing the G major scale are shown below. First is the scale in the bass staff, to be played by the left hand. The first note is a low G note. Notice the fingering written under the music – a crossover is necessary when moving between D and E.

Piano Scale Exercise: Left Hand
Piano Tips for piano hand coordination: Left Hand Piano Scale Exercise

Next, play the scale with both hands together (as shown in the image below). Play slowly and listen carefully. Don’t rush! The most important thing is to play each note with both hands at exactly the same time, and to be sure all notes are even in length and volume. The crossovers occur at different times for each hand, so take care not to lose your timing at these points. Practicing playing a scale with both hands regularly and consistently will help you build up long term piano hand coordination.

Piano Scale Exercise: Both Hands

Piano Tips for piano hand coordination: Both Hands Piano Scale Exercise

Once you can play a scale smoothly and evenly with both hands together, the next step is to play it over more than one octave. The following example shows the G major scale played in eighth notes over two octaves. The first note of the second octave is played with the thumb (1). This necessitates thumb under and crossover techniques. Take them slowly at first and only increase the speed once it is totally comfortable.

Piano Scale Exercise: Both Hands Over Two Octaves

Piano Tips for improving piano hand coordination: Piano Scale Exercise - Both Hands Over Two Octaves

This final piece, ‘Changing Lanes’ will put your scale practice to good use. The melody is played first by the left hand and then the right, the hands reverse roles every four bars!

Changing Lanes

Piano Tips for improving piano hand coordination: Changing Lanes 1

Piano Tips for improving piano hand coordination: Changing Lanes 2

Piano Tips for improving piano hand coordination: Changing Lanes 3

Piano Tips for improving piano hand coordination: Changing Lanes 4


Who is LearnToPlayMusic.com

LearnToPlayMusic.com is the world’s leading music education innovator and publisher of print, eBooks, apps and online lessons.

– Continue learning with Learn To Play Music at LearnToPlayMusic.com

The post Piano Tips: Improving Piano Hand Coordination appeared first on Learn To Play Music Blog.

]]>
https://www.learntoplaymusic.com/blog/piano-tips-improving-piano-hand-coordination/feed/ 8
Easy Guitar Songs for Beginners https://www.learntoplaymusic.com/blog/free-easy-guitar-songs-beginners/ https://www.learntoplaymusic.com/blog/free-easy-guitar-songs-beginners/#comments Thu, 02 Oct 2014 00:30:43 +0000 https://www.learntoplaymusic.com/blog/?p=21938 Guitar Songs for Beginners Today we thought we’d share with you some free and easy guitar songs for beginners. Throughout this post we’ve shared links to our other free blog posts, so if there’s any […]

The post Easy Guitar Songs for Beginners appeared first on Learn To Play Music Blog.

]]>
Guitar Songs for Beginners

Today we thought we’d share with you some free and easy guitar songs for beginners. Throughout this post we’ve shared links to our other free blog posts, so if there’s any technique, note or chord you don’t know you can still easily learn to play these songs. To play these guitar songs for beginners you should know:

 Ode to Joy

This guitar song for beginners is the melody to Beethoven’s 9th Symphony. Instead of writing the strumming above each measure of music, it is easier to write it as a Rhythm Pattern. This indicates which strumming pattern to use in each measure throughout the song. In measure 8 there are two chords in the measure. Each one receives two counts. Remember to use the slide finger when changing between the G and D7 chords. To play this beginner guitar song you will need to know:

Guitar Song for Beginners Rhythm Pattern 1

Guitar Songs for Beginners - Ode to Joy 1

Guitar Songs for Beginners - Ode to Joy 2

Aura Lee

The easy guitar song, Aura Lee, contains quarter and half rests. Remember to count as you play to help you keep time. To play this beginner guitar song you will need to know:

Guitar Song for Beginners Rhythm Pattern 2

Guitar Songs for Beginners - Aura Lee 1

Guitar Songs for Beginners - Aura Lee 2

Rock Riff #1

This easy guitar riff is a pattern of notes that are repeated. The following example contains a two-measure riff played twice. The example is then repeated and ended by a whole note (semibreve). To play this beginner guitar song you will need to know:

Guitar Song for Beginners Rhythm Pattern 2

Guitar Songs for Beginners - Rock Riff 1

Marianne

The easy guitar song Marianne is a Caribbean folk song. It contains a whole rest in measures 4, 8, 12 and 16, and uses only the chords and notes you have learned so far.

Guitar Songs for Beginners - Marianne 1

Guitar Songs for Beginners - Marianne 3

Guitar Songs for Beginners - Marianne 2

Rock Riff #2

Play the following easy guitar rock riff using alternate picking. In alternate picking, use a down pick on the beat (the number count) and an up pick off the beat (the ‘and’ count). This guitar song for beginners uses only the chords and notes you have learned so far.

Guitar Song for Beginners Rhythm Pattern 3

Guitar Songs for Beginners - Rock Riff 2

You can continue to learn guitar songs for beginners using our free online guitar lessons, which expands greatly on this post. For even more guitar music lessons, why not check out one of our most popular guitar lesson books: Progressive Beginner Guitar.

– Thanks for learning with us today. You can continue learning with us at LearnToPlayMusic.com.

The post Easy Guitar Songs for Beginners appeared first on Learn To Play Music Blog.

]]>
https://www.learntoplaymusic.com/blog/free-easy-guitar-songs-beginners/feed/ 25
This XML file does not appear to have any style information associated with it. The document tree is shown below.
<rss xmlns:content="http://purl.org/rss/1.0/modules/content/" xmlns:wfw="http://wellformedweb.org/CommentAPI/" xmlns:dc="http://purl.org/dc/elements/1.1/" xmlns:atom="http://www.w3.org/2005/Atom" xmlns:sy="http://purl.org/rss/1.0/modules/syndication/" xmlns:slash="http://purl.org/rss/1.0/modules/slash/" version="2.0">
<channel>
<title>Learn To Play Music Blog » LTP Editor</title>
<atom:link href="https://www.learntoplaymusic.com/blog/author/ltpeditor/feed/" rel="self" type="application/rss+xml"/>
<link>https://www.learntoplaymusic.com/blog</link>
<description/>
<lastBuildDate>Sat, 28 Jan 2023 12:37:50 +0000</lastBuildDate>
<language>en-US</language>
<sy:updatePeriod>hourly</sy:updatePeriod>
<sy:updateFrequency>1</sy:updateFrequency>
<generator>https://wordpress.org/?v=373</generator>
<item>
<title>How To Play Guitar Techniques: Vibrato and Bending</title>
<link>https://www.learntoplaymusic.com/blog/how-to-play-guitar-techniques-vibrato-bending/</link>
<comments>https://www.learntoplaymusic.com/blog/how-to-play-guitar-techniques-vibrato-bending/#comments</comments>
<pubDate>Fri, 28 Nov 2014 01:06:55 +0000</pubDate>
<dc:creator>
<![CDATA[ LTP Editor ]]>
</dc:creator>
<category>
<![CDATA[ Guitar ]]>
</category>
<guid isPermaLink="false">https://www.learntoplaymusic.com/blog/?p=23198</guid>
<description>
<![CDATA[ <p>Techniques for the lead guitarist Have you ever dutifully practiced your scales, as shown to you by a guitar teacher or in a book and wondered what is needed to turn it into real music? [&#8230;]</p> <p>The post <a rel="nofollow" href="https://www.learntoplaymusic.com/blog/how-to-play-guitar-techniques-vibrato-bending/">How To Play Guitar Techniques: Vibrato and Bending</a> appeared first on <a rel="nofollow" href="https://www.learntoplaymusic.com/blog">Learn To Play Music Blog</a>.</p> ]]>
</description>
<content:encoded>
<![CDATA[ <h2><strong>Techniques for the lead guitarist</strong></h2> <p>Have you ever dutifully practiced your scales, as shown to you by a guitar teacher or in a book and wondered what is needed to turn it into real music? Vibrato and bending are two great techniques that will help to bring your guitar playing alive. Think of any accomplished lead guitarist &#8211; all of them would use vibrato and bending at some stage, to breathe life and expression into their playing. Let’s have a look at how you can do this too.</p> <h2><strong>What is Vibrato?</strong></h2> <p>Vibrato is a technique of rapidly moving a note up and down in the direction of the adjacent strings. Vibrato is an important method of sustaining a note once it has been picked. It also gives much more expression to your playing. Vibrato is usually found on long notes, or a note at the end of a phrase. Vibrato is usually obtained by the movement of the wrist away from the neck and back towards the neck, much like turning a doorknob. The symbol for vibrato is a wavy line. Try playing this yourself.</p> <p><a href="https://www.learntoplaymusic.com/blog/wp-content/uploads/2014/11/01.png"><img class="alignnone size-medium wp-image-23200" src="https://www.learntoplaymusic.com/blog/wp-content/uploads/2014/11/01-300x212.png" alt="01" width="300" height="212" /></a> <a href="https://www.learntoplaymusic.com/blog/wp-content/uploads/2014/11/02.jpg"><img class="alignnone wp-image-23202" src="https://www.learntoplaymusic.com/blog/wp-content/uploads/2014/11/02-300x224.jpg" alt="02" width="271" height="202" /></a></p> <h2><b>Bending Notes</b></h2> <p>Bending notes is one of the classic sounds of lead guitar. Players such as B.B. King, Buddy Guy, Albert King, Stevie Ray Vaughan, Gary Moore, Joe Satriani, Paul Gilbert and Yngwie Malmsteen are all great note benders. Bending helps to add emotion and intensity to the music as well as giving your playing a more vocal-like quality. A bend is achieved by fretting a note and then pushing the string sideways across the fretboard towards the adjacent strings. One important point with bending notes is to use a supporting finger behind the finger you are using to make the bend. This gives you more strength and better control. When bending notes, it is also helpful to have the thumb of the left hand right up over the edge of the neck to help push back against the pressure of the fingers. The symbol for a bend is a curved arrow accompanied by the symbol &#8220;B&#8221;. Try the following bend:</p> <p><a href="https://www.learntoplaymusic.com/blog/wp-content/uploads/2014/11/03.png"><img class="alignnone wp-image-23204" src="https://www.learntoplaymusic.com/blog/wp-content/uploads/2014/11/03-294x300.png" alt="03" width="230" height="235" /></a><br /> <a href="https://www.learntoplaymusic.com/blog/wp-content/uploads/2014/11/04.jpg"><img class="alignnone wp-image-23205 " src="https://www.learntoplaymusic.com/blog/wp-content/uploads/2014/11/04-300x214.jpg" alt="04" width="280" height="200" /></a>  <a href="https://www.learntoplaymusic.com/blog/wp-content/uploads/2014/11/05.jpg"><img class="alignnone wp-image-23206" src="https://www.learntoplaymusic.com/blog/wp-content/uploads/2014/11/05-300x214.jpg" alt="05" width="282" height="201" /></a></p> <p>Here is an exercise for developing your ability to bend notes. Make sure you reach the exact pitch you are trying to bend to. In this exercise you are bending from D to E on the third string and then playing another E on the second string. Listen carefully to make sure your bent E note is not sharp or flat. Try recording yourself bending some notes and then listen back to check the pitch of your bends.</p> <p><a href="https://www.learntoplaymusic.com/blog/wp-content/uploads/2014/11/06.png"><img class="alignnone wp-image-23208" src="https://www.learntoplaymusic.com/blog/wp-content/uploads/2014/11/06-300x233.png" alt="06" width="288" height="224" /></a> <a href="https://www.learntoplaymusic.com/blog/wp-content/uploads/2014/11/07.jpg"><img class="alignnone wp-image-23209" src="https://www.learntoplaymusic.com/blog/wp-content/uploads/2014/11/07-300x214.jpg" alt="07" width="279" height="199" /></a></p> <p>The following lick demonstrates the use of vibrato and bending. Give this a try:</p> <p><a href="https://www.learntoplaymusic.com/blog/wp-content/uploads/2014/11/08.png"><img class="alignnone size-full wp-image-23210" src="https://www.learntoplaymusic.com/blog/wp-content/uploads/2014/11/08.png" alt="08" width="951" height="454" /></a></p> <p>Here is the audio recording, so you can hear how it sounds:</p> <div style="border:1px solid #666;width:100%px;height:50px;"> <div id="container178F">You need <a href="http://get.adobe.com/flashplayer/">Flash Player 9 or later</a> installed to play this s3audio</div> <p> <script type="text/javascript"> jwplayer('container178F').setup( { 'id': 'container178F', 'wmode': 'transparent', 'icons': 'true', 'allowscriptaccess': 'always', 'allownetworking': 'all', 'file': 'https://ltp-us-cloudfront-source.s3.amazonaws.com/aud/cat/69240-old/69240-17800_FM.mp3', 'width': '100%', 'height': '50', 'allowfullscreen': 'false', 'autostart': 'false', 'controlbar': 'bottom', 'dock': 'true', 'abouttext': 'S3Media Stream 5.6.6', 'aboutlink': 'http://www.wp21century.com', 'skin':'https://www.learntoplaymusic.com/blog/wp-content/plugins/s3mediastream-video/skins/beelden/beelden.xml', 'image':'https://dur3da0b6fjvs.cloudfront.net/img/com/poster-audio_player.jpg', 'plugins': { }, 'modes': [ {type: 'flash', src: 'https://www.learntoplaymusic.com/blog/wp-content/plugins/s3mediastream-video/mediaplayer/player.swf'}, { type: 'html5', config: { 'file': 'https://ltp-us-cloudfront-source.s3.amazonaws.com/aud/cat/69240-old/69240-17800_FM.mp3', 'provider': 'sound' } }, { type: 'download', config: { 'file': 'https://ltp-us-cloudfront-source.s3.amazonaws.com/aud/cat/69240-old/69240-17800_FM.mp3', 'provider': 'sound' } } ] }); </script> </div> <p> <!-- End S3Media Stream script --></p> <p>To conclude this blog, try playing the following lick, based upon the C blues scale. Try altering the vibrato as well &#8211; making it stronger can inject even more life into your playing. Keep practicing to develop a good ear and feel for these techniques.</p> <p><a href="https://www.learntoplaymusic.com/blog/wp-content/uploads/2014/11/09.png"><img class="alignnone size-full wp-image-23211" src="https://www.learntoplaymusic.com/blog/wp-content/uploads/2014/11/09.png" alt="09" width="946" height="477" /></a></p> <p>Here is the audio recording, so you can hear how it sounds:</p> <div style="border:1px solid #666;width:100%px;height:50px;"> <div id="container205F">You need <a href="http://get.adobe.com/flashplayer/">Flash Player 9 or later</a> installed to play this s3audio</div> <p> <script type="text/javascript"> jwplayer('container205F').setup( { 'id': 'container205F', 'wmode': 'transparent', 'icons': 'true', 'allowscriptaccess': 'always', 'allownetworking': 'all', 'file': 'https://ltp-us-cloudfront-source.s3.amazonaws.com/aud/cat/69240-old/69240-20500_FM.mp3', 'width': '100%', 'height': '50', 'allowfullscreen': 'false', 'autostart': 'false', 'controlbar': 'bottom', 'dock': 'true', 'abouttext': 'S3Media Stream 5.6.6', 'aboutlink': 'http://www.wp21century.com', 'skin':'https://www.learntoplaymusic.com/blog/wp-content/plugins/s3mediastream-video/skins/beelden/beelden.xml', 'image':'https://dur3da0b6fjvs.cloudfront.net/img/com/poster-audio_player.jpg', 'plugins': { }, 'modes': [ {type: 'flash', src: 'https://www.learntoplaymusic.com/blog/wp-content/plugins/s3mediastream-video/mediaplayer/player.swf'}, { type: 'html5', config: { 'file': 'https://ltp-us-cloudfront-source.s3.amazonaws.com/aud/cat/69240-old/69240-20500_FM.mp3', 'provider': 'sound' } }, { type: 'download', config: { 'file': 'https://ltp-us-cloudfront-source.s3.amazonaws.com/aud/cat/69240-old/69240-20500_FM.mp3', 'provider': 'sound' } } ] }); </script> </div> <p> <!-- End S3Media Stream script --></p> <p>We hope you&#8217;ve enjoyed this introduction to vibrato and bending. If you are keen to delve further into this and learn some great guitar licks, have a look at the <a href="https://www.learntoplaymusic.com/catalogsearch/result/?q=69240" target="_blank">Complete Blues Guitar Manual</a>.</p> <h3><strong>Who is LearnToPlayMusic.com</strong></h3> <p><a href="https://www.learntoplaymusic.com" target="_blank">LearnToPlayMusic.com</a> is the world’s leading music education innovator and publisher of print, eBooks, apps and online lessons.</p> <p>&#8211; Continue learning with Learn To Play Music at <a href="https://www.learntoplaymusic.com" target="_blank">LearnToPlayMusic.com</a></p> <p>The post <a rel="nofollow" href="https://www.learntoplaymusic.com/blog/how-to-play-guitar-techniques-vibrato-bending/">How To Play Guitar Techniques: Vibrato and Bending</a> appeared first on <a rel="nofollow" href="https://www.learntoplaymusic.com/blog">Learn To Play Music Blog</a>.</p> ]]>
</content:encoded>
<wfw:commentRss>https://www.learntoplaymusic.com/blog/how-to-play-guitar-techniques-vibrato-bending/feed/</wfw:commentRss>
<slash:comments>21</slash:comments>
</item>
<item>
<title>How to Read Music and Scores</title>
<link>https://www.learntoplaymusic.com/blog/how-read-music-scores/</link>
<comments>https://www.learntoplaymusic.com/blog/how-read-music-scores/#comments</comments>
<pubDate>Fri, 31 Oct 2014 02:52:02 +0000</pubDate>
<dc:creator>
<![CDATA[ LTP Editor ]]>
</dc:creator>
<category>
<![CDATA[ Music Theory ]]>
</category>
<guid isPermaLink="false">https://www.learntoplaymusic.com/blog/?p=22801</guid>
<description>
<![CDATA[ <p>Knowing how to read music is a valuable skill for anyone involved in music composition, songwriting, performance, teaching, recording and production. Many instrumentalists are adept at sight-reading, which is the ability to play directly from a [&#8230;]</p> <p>The post <a rel="nofollow" href="https://www.learntoplaymusic.com/blog/how-read-music-scores/">How to Read Music and Scores</a> appeared first on <a rel="nofollow" href="https://www.learntoplaymusic.com/blog">Learn To Play Music Blog</a>.</p> ]]>
</description>
<content:encoded>
<![CDATA[ <p>Knowing how to read music is a valuable skill for anyone involved in music composition, songwriting, performance, teaching, recording and production. Many instrumentalists are adept at sight-reading, which is the ability to play directly from a written score. However, a basic-to-intermediate-level reading ability will still help you to grasp the overall structure of a piece, what the key is, its level of complexity, tempo and timing, dynamics and many other musical details. This will allow you to better understand and communicate with other musicians, given you also understand the vocabulary and can follow along with the music.</p> <p>Once you have the fundamentals down, a great way to learn how to read music is to get hold of some music scores (classical, jazz, and pop scores if possible) and try to follow along with the recordings. This will be easier if you know a musician or teacher who can help you to follow along at first. Scores can be found at traditional music stores and online sheet music retailers. If you’ve never read music before, let’s get started with some basics. The following information comes from <a href="https://www.learntoplaymusic.com/catalogsearch/result/?q=69226" target="_blank">Progressive Theory</a>, available online.</p> <h2><strong>The Musical Alphabet</strong></h2> <p>The musical alphabet consists of 7 letters:</p> <p style="text-align: center;"><strong><a href="https://www.learntoplaymusic.com/blog/wp-content/uploads/2014/10/15.png"><img class="alignnone wp-image-22834" src="https://www.learntoplaymusic.com/blog/wp-content/uploads/2014/10/15.png" alt="15" width="300" height="33" /></a></strong></p> <p>Each letter represents a music note. These notes are written on a staff, which consists of 5 parallel lines. Notes are written on these lines and in the spaces between them.</p> <p><a href="https://www.learntoplaymusic.com/blog/wp-content/uploads/2014/10/01.png"><img class="alignnone wp-image-22802 aligncenter" src="https://www.learntoplaymusic.com/blog/wp-content/uploads/2014/10/01.png" alt="01" width="300" height="82" /></a></p> <p><a href="https://www.learntoplaymusic.com/blog/wp-content/uploads/2014/10/02.png"><img class="alignnone size-full wp-image-22804 aligncenter" src="https://www.learntoplaymusic.com/blog/wp-content/uploads/2014/10/02.png" alt="02" width="471" height="169" /></a></p> <h2><strong>The Treble Staff</strong></h2> <p>A staff with a treble clef written on it is called a treble staff:</p> <p><a href="https://www.learntoplaymusic.com/blog/wp-content/uploads/2014/10/03.png"><img class="alignnone wp-image-22806 aligncenter" src="https://www.learntoplaymusic.com/blog/wp-content/uploads/2014/10/03.png" alt="03" width="280" height="107" /></a><br /> The notes on the lines and spaces on the staff are named alphabetically as shown below. Each new note is said to be higher or lower in pitch than the one before it or after it.</p> <p><a href="https://www.learntoplaymusic.com/blog/wp-content/uploads/2014/10/04.png"><img class="alignnone size-full wp-image-22808 aligncenter" src="https://www.learntoplaymusic.com/blog/wp-content/uploads/2014/10/04.png" alt="04" width="1016" height="258" /><br /> </a>The head of a note indicates its position on the staff, as shown:</p> <p><a href="https://www.learntoplaymusic.com/blog/wp-content/uploads/2014/10/05.png"><img class="alignnone wp-image-22810 aligncenter" src="https://www.learntoplaymusic.com/blog/wp-content/uploads/2014/10/05.png" alt="05" width="150" height="108" /></a></p> <p>When the note head is below the middle staff line the stem points upward and when the head is above the middle line the stem points downward. A note placed on the middle line (B) can have its stem pointing either up or down.</p> <h2><b>Notes on the Treble Staff</b></h2> <p><a href="https://www.learntoplaymusic.com/blog/wp-content/uploads/2014/10/07.png"><img class="alignnone size-full wp-image-22813 aligncenter" src="https://www.learntoplaymusic.com/blog/wp-content/uploads/2014/10/07.png" alt="07" width="1013" height="254" /></a></p> <p><a href="https://www.learntoplaymusic.com/blog/wp-content/uploads/2014/10/08.png"><img class="alignnone size-full wp-image-22815 aligncenter" src="https://www.learntoplaymusic.com/blog/wp-content/uploads/2014/10/08.png" alt="08" width="472" height="169" /></a></p> <h2><strong>Notes on the Bass Staff</strong></h2> <p><a href="https://www.learntoplaymusic.com/blog/wp-content/uploads/2014/10/09.png"><img class="alignnone size-full wp-image-22817 aligncenter" src="https://www.learntoplaymusic.com/blog/wp-content/uploads/2014/10/09.png" alt="09" width="1016" height="242" /><br /> </a><br /> The following staff has notes written on the lines and in the spaces of the <strong>bass staff</strong> in random order. Using a sheet of paper, copy the following notes and write the note name above each one. This will help you to test your note name knowledge, and improve sight reading.</p> <p><a href="https://www.learntoplaymusic.com/blog/wp-content/uploads/2014/10/10.png"><img class="alignnone size-full wp-image-22820 aligncenter" src="https://www.learntoplaymusic.com/blog/wp-content/uploads/2014/10/10.png" alt="10" width="1022" height="120" /></a><a href="https://www.learntoplaymusic.com/blog/wp-content/uploads/2014/10/11.png"><img class="alignnone size-full wp-image-22822 aligncenter" src="https://www.learntoplaymusic.com/blog/wp-content/uploads/2014/10/11.png" alt="11" width="1022" height="117" /></a></p> <h2><b>The Grand Staff</b></h2> <p>When the treble and bass staves are joined together by a line and a bracket, they are called a grand staff. Piano and keyboard music are written on the grand staff.</p> <p><a href="https://www.learntoplaymusic.com/blog/wp-content/uploads/2014/10/12.png"><img class="alignnone wp-image-22825 aligncenter" src="https://www.learntoplaymusic.com/blog/wp-content/uploads/2014/10/12.png" alt="12" width="300" height="185" /></a><a href="https://www.learntoplaymusic.com/blog/wp-content/uploads/2014/10/13.png"><img class="alignnone size-full wp-image-22826 aligncenter" src="https://www.learntoplaymusic.com/blog/wp-content/uploads/2014/10/13.png" alt="13" width="1021" height="281" /></a></p> <h2><b>Bar Lines</b></h2> <p>In most music, bar lines are drawn across the staff, which divides the music into sections called bars or measures. A double bar line signifies the end of an important section of music, while a final bar line is written at the end of a piece.</p> <p><a href="https://www.learntoplaymusic.com/blog/wp-content/uploads/2014/10/14.png"><img class="alignnone size-full wp-image-22829 aligncenter" src="https://www.learntoplaymusic.com/blog/wp-content/uploads/2014/10/14.png" alt="14" width="1021" height="214" /></a></p> <p>If you’ve enjoyed this introduction to reading music and would like continue further, we recommend you check out <a href="https://www.learntoplaymusic.com/catalogsearch/result/?q=69226" target="_blank">Progressive Theory</a>, available online now.</p> <p>&nbsp;</p> <h3><strong>Who is LearnToPlayMusic.com</strong></h3> <p><a href="https://www.learntoplaymusic.com" target="_blank">LearnToPlayMusic.com</a> is the world’s leading music education innovator and publisher of print, eBooks, apps and online lessons.</p> <p>&#8211; Continue learning with Learn To Play Music at <a href="https://www.learntoplaymusic.com" target="_blank">LearnToPlayMusic.com</a></p> <p>The post <a rel="nofollow" href="https://www.learntoplaymusic.com/blog/how-read-music-scores/">How to Read Music and Scores</a> appeared first on <a rel="nofollow" href="https://www.learntoplaymusic.com/blog">Learn To Play Music Blog</a>.</p> ]]>
</content:encoded>
<wfw:commentRss>https://www.learntoplaymusic.com/blog/how-read-music-scores/feed/</wfw:commentRss>
<slash:comments>12</slash:comments>
</item>
<item>
<title>Slap Bass Technique – How to Play Bass</title>
<link>https://www.learntoplaymusic.com/blog/slap-bass-technique/</link>
<comments>https://www.learntoplaymusic.com/blog/slap-bass-technique/#comments</comments>
<pubDate>Sun, 26 Oct 2014 21:51:01 +0000</pubDate>
<dc:creator>
<![CDATA[ LTP Editor ]]>
</dc:creator>
<category>
<![CDATA[ Bass Guitar ]]>
</category>
<guid isPermaLink="false">https://www.learntoplaymusic.com/blog/?p=22740</guid>
<description>
<![CDATA[ <p>Slap Bass Technique Slap bass is a popular technique often used in funk music, but in reality, it’s just a different way to hit the string. In this article, we’ll give you a few pointers [&#8230;]</p> <p>The post <a rel="nofollow" href="https://www.learntoplaymusic.com/blog/slap-bass-technique/">Slap Bass Technique &#8211; How to Play Bass</a> appeared first on <a rel="nofollow" href="https://www.learntoplaymusic.com/blog">Learn To Play Music Blog</a>.</p> ]]>
</description>
<content:encoded>
<![CDATA[ <h2><strong>Slap Bass Technique</strong></h2> <p>Slap bass is a popular technique often used in funk music, but in reality, it’s just a different way to hit the string. In this article, we’ll give you a few pointers on getting started with slap bass technique, and finish with a more advanced exercise to demonstrate what it sounds like in a musical context. Often just called <em>slap,</em> this style of bass playing involves &#8216;slapping&#8217; the strings with the right thumb and &#8216;popping&#8217; with the right hand fingers, giving a percussive characteristic to a note&#8217;s sound.</p> <h2><strong>Thumb Slapping Technique</strong></h2> <p><a href="https://www.learntoplaymusic.com/blog/wp-content/uploads/2014/10/Slap-Technique-01-01.jpg"><img class="alignnone wp-image-22742" src="https://www.learntoplaymusic.com/blog/wp-content/uploads/2014/10/Slap-Technique-01-01-300x224.jpg" alt="Slap-Technique-01-01" width="275" height="206" /></a> <a href="https://www.learntoplaymusic.com/blog/wp-content/uploads/2014/10/Slap-Technique-01-02.jpg"> </a><a href="https://www.learntoplaymusic.com/blog/wp-content/uploads/2014/10/Slap-Technique-01-02.jpg"><img class="alignnone wp-image-22744" src="https://www.learntoplaymusic.com/blog/wp-content/uploads/2014/10/Slap-Technique-01-02-300x224.jpg" alt="Slap-Technique-01-02" width="275" height="206" /></a></p> <p>The best way to begin playing this style is to practice slapping the open strings with the knuckle joint on the side of the right thumb, as demonstrated in the following example and shown in the photographs above. The best place to strike the string is right at the end of the fretboard. This allows for a bit of &#8220;give&#8221; in the string and also forces the string down onto the frets, thus producing the distinctive slap sound. Make sure you strike the string clearly and then let your thumb rebound up off the string like a drum stick rebounding off a drum. If you leave your thumb in contact with the string, it will deaden the sound and none of the notes will be clear. Notes slapped with the thumb are indicated by the letter T (<em>meaning thumb</em>) written above or below the note. Try the following exercises, which can all be found in <a href="https://www.learntoplaymusic.com/catalogsearch/result/?q=11871" target="_blank">Beginner Slap Bass</a>.</p> <p><strong><a href="https://www.learntoplaymusic.com/blog/wp-content/uploads/2014/10/11871-00100.png"><img class="alignnone size-full wp-image-22746" src="https://www.learntoplaymusic.com/blog/wp-content/uploads/2014/10/11871-00100.png" alt="11871-00100" width="944" height="245" /></a></strong></p> <h2><strong>Left Hand Damping</strong></h2> <p>As you strike each string with the thumb, be sure to damp the other strings with your left hand by laying your fingers lightly across the strings. In slap playing, damping out the sounds you don’t want is as important as sounding the notes you do want.</p> <p>Listen carefully to your playing to make sure there are no unwanted notes ringing. If you do hear any, analyze which strings they are coming from and practice damping them out with your left hand. A good way to get used to left hand damping is to play a quarter note on the first and third beats of the bar and damp the string on the second and fourth beats (indicated by quarter rests) as shown in the following example.</p> <p><a href="https://www.learntoplaymusic.com/blog/wp-content/uploads/2014/10/11871-00200.png"><img class="alignnone size-full wp-image-22748" src="https://www.learntoplaymusic.com/blog/wp-content/uploads/2014/10/11871-00200.png" alt="11871-00200" width="945" height="292" /></a></p> <h2><strong>Popping Technique</strong></h2> <p>Apart from thumb slapping, the other essential part of the slap bass style is the use of the finger popping technique. This technique is usually done with the index finger (<em>i</em>) but the middle finger (<em>m</em>) is also sometimes used. The technique is performed by putting the end of the finger slightly under the string and then pulling it upwards and away, allowing the string to snap back against the fretboard, thus producing the popping sound. A combination of arm and wrist rotation is used to achieve this technique.</p> <p><a href="https://www.learntoplaymusic.com/blog/wp-content/uploads/2014/10/Popping-Technique-01.jpg"><img class="alignnone wp-image-22749" src="https://www.learntoplaymusic.com/blog/wp-content/uploads/2014/10/Popping-Technique-01-300x224.jpg" alt="Popping-Technique-01" width="275" height="206" /></a> <a href="https://www.learntoplaymusic.com/blog/wp-content/uploads/2014/10/Popping-Technique-02.jpg"> </a><a href="https://www.learntoplaymusic.com/blog/wp-content/uploads/2014/10/Popping-Technique-02.jpg"><img class="alignnone wp-image-22750" src="https://www.learntoplaymusic.com/blog/wp-content/uploads/2014/10/Popping-Technique-02-300x224.jpg" alt="Popping-Technique-02" width="275" height="206" /></a></p> <p>Study the photos and practice this technique in the following exercises. The popping technique is indicated in the notation by the letter F written above or below the note. To begin with, try popping the open G and D strings, as shown.</p> <p><a href="https://www.learntoplaymusic.com/blog/wp-content/uploads/2014/10/11871-02600.png"><img class="alignnone size-full wp-image-22752" src="https://www.learntoplaymusic.com/blog/wp-content/uploads/2014/10/11871-02600.png" alt="11871-02600" width="945" height="238" /></a></p> <p>The next step is to combine the slapping and popping techniques. Take this slowly at first and use a metronome to make sure you are keeping good time.</p> <p><a href="https://www.learntoplaymusic.com/blog/wp-content/uploads/2014/10/11871-02700.png"><img class="alignnone size-full wp-image-22754" src="https://www.learntoplaymusic.com/blog/wp-content/uploads/2014/10/11871-02700.png" alt="11871-02700" width="944" height="284" /></a></p> <p>And finally, here is a more advanced example of slap bass, to give you a taste of where you can go with this style. If you’re keen to pursue slap bass playing, have a look at <a href="https://www.learntoplaymusic.com/catalogsearch/result/?q=11871" target="_blank">Beginner Slap Bass</a>.</p> <p><a href="https://www.learntoplaymusic.com/blog/wp-content/uploads/2014/10/11871-09100.png"><img class="alignnone size-full wp-image-22755" src="https://www.learntoplaymusic.com/blog/wp-content/uploads/2014/10/11871-09100.png" alt="11871-09100" width="944" height="337" /></a></p> <p>You can watch the video for the exercise below, to see and hear how it should sound.</p> <p style="text-align: center;"><div style="max-width:630px;max-height:350px;"><div class="video-shortcode"><iframe title="YouTube video player" width="630" height="350" src="http://www.youtube.com/embed/f7-0Gs1o4ZA?wmode=transparent" frameborder="0" allowfullscreen></iframe></div></div><br /> <strong> Who is LearnToPlayMusic.com</strong></p> <p><a href="https://www.learntoplaymusic.com" target="_blank">LearnToPlayMusic.com</a> is the world’s leading music education innovator and publisher of print, eBooks, apps and online lessons.</p> <p>&#8211; Continue learning with Learn To Play Music at <a href="https://www.learntoplaymusic.com" target="_blank">LearnToPlayMusic.com</a></p> <p>The post <a rel="nofollow" href="https://www.learntoplaymusic.com/blog/slap-bass-technique/">Slap Bass Technique &#8211; How to Play Bass</a> appeared first on <a rel="nofollow" href="https://www.learntoplaymusic.com/blog">Learn To Play Music Blog</a>.</p> ]]>
</content:encoded>
<wfw:commentRss>https://www.learntoplaymusic.com/blog/slap-bass-technique/feed/</wfw:commentRss>
<slash:comments>3</slash:comments>
</item>
<item>
<title>Shred Guitar: The Art of Blazing Fretboards</title>
<link>https://www.learntoplaymusic.com/blog/shred-guitar-blazing-fretboards/</link>
<comments>https://www.learntoplaymusic.com/blog/shred-guitar-blazing-fretboards/#comments</comments>
<pubDate>Tue, 21 Oct 2014 02:00:15 +0000</pubDate>
<dc:creator>
<![CDATA[ LTP Editor ]]>
</dc:creator>
<category>
<![CDATA[ Guitar ]]>
</category>
<guid isPermaLink="false">https://www.learntoplaymusic.com/blog/?p=22436</guid>
<description>
<![CDATA[ <p>What is Shred Guitar? Let it be said that there is a certain mystique to the art of guitar shred. Indeed, the shred guitarist in top form appears to transcend mere mortals, to the realm [&#8230;]</p> <p>The post <a rel="nofollow" href="https://www.learntoplaymusic.com/blog/shred-guitar-blazing-fretboards/">Shred Guitar: The Art of Blazing Fretboards</a> appeared first on <a rel="nofollow" href="https://www.learntoplaymusic.com/blog">Learn To Play Music Blog</a>.</p> ]]>
</description>
<content:encoded>
<![CDATA[ <h2><strong>What is Shred Guitar?</strong></h2> <p>Let it be said that there is a certain mystique to the art of guitar shred. Indeed, the shred guitarist in top form appears to transcend mere mortals, to the realm of the demigods. Think blindingly fast, accurate, over-the-top, virtuoso guitar playing… and that should get you somewhere in the ballpark. Ladies and gents, shred guitar is not for the faint-hearted; neither is it a style of music but more a way of playing the instrument and showing off advanced guitar skills. Most shred guitarists play using an electric guitar with distortion and high-gain. Mention the word ‘shred’ though, and most musicians will think of some form of metal oriented music, as this is where you’ll most often encounter it. But you can shred on an acoustic too.</p> <h2><b>A Brief Overview of Shred Guitar</b></h2> <p>During the 1980s, this style of playing reached its peak. Guitarists such as Eddie Van Halen, Yngwie Malmsteen, Jason Becker, Michael Angelo Batio, Paul Gilbert, Joe Satriani, Steve Vai and John Petrucci burst onto the professional music scene with a level of precision guitar playing never-before-seen in heavy rock and metal. It is most popular in metal, jazz-fusion and other progressive/technical music. This approach to guitar playing relies strongly upon alternate picking, sweep picking, finger tapping and palm muting.</p> <h2><b>Why Shred Guitar?</b></h2> <p>Whether or not you identify with the guitarists mentioned, or with hair-metal bands of the ‘80s, or a simple mention of the word “shred” strikes fear into your heart &#8211; there is actually great benefit to having this ability. Think about it &#8211; being able to play fast and accurately all over your instrument requires some serious technique, not to mention a thorough working knowledge of scales and modes. You don’t even need to play this way when performing either &#8211; shred guitar serves as great practice.</p> <p>Whatever style of music you’re into, if you play lead guitar, there can be no harm in at least <i>developing</i> your technique and fretboard knowledge to a high level. In fact you’ll have a freedom on your instrument that few have and will be far more versatile in your playing. A word of a warning &#8211; many an intrepid guitarist has ventured into the unchartered waters of shred, only to emerge with a new-found love for high-level playing. In other words, you might find yourself becoming a metal musician, or jazz, or country-bluegrass player! Can’t let all that hard work go to waste.</p> <h2><b>Getting Started with Shred Guitar</b></h2> <p>So you want to be able to shred with the best of them? Understand that it won’t happen overnight &#8211; this will require commitment. Here’s what you’ll need to get a good start:</p> <ol> <li>Learn all 7 mode patterns on the fretboard and how they link together, creating one master pattern. It will be important to be able to distinguish between the specific modal patterns later on.</li> <li>Learn all 5 pentatonic patterns and how they link to form a master pattern.</li> <li>Develop your alternate picking technique, through the use of picking exercises, which incorporate long scale-runs and string skipping. If you are new to picking, it is advisable to find a reputable guitar teacher who can correct any bad habits you may be forming. It is vital that you develop a relaxed and fluid picking technique, as well as fretting technique.</li> <li>Get a metronome. This is available as a standalone device or a smartphone app.</li> <li>Practice technique exercises which employ a range of scales and licks, across the entire fretboard, using a metronome as often as you can. Start very slowly and be militant about picking each note cleanly. Your aim is cleanliness and accuracy.</li> <li>Practice frequently and practice well. Set goals, understand what you’re aiming for and critically assess your technique and sound while practicing.</li> <li>Be patient. It may take a year or two of solid practice each day. Find a good teacher who can help you stay focused.</li> <li>Listen to music with shred guitar in it &#8211; allow yourself to enjoy it and be inspired.</li> </ol> <h2><b>Shred Guitar Exercises</b></h2> <p>To conclude this article, here are a few shred guitar exercises you may wish to try. These can be found in <a href="https://www.learntoplaymusic.com/catalogsearch/result/?q=11880" target="_blank">Beginner Metal Guitar</a>.</p> <p>From <a href="https://www.learntoplaymusic.com/catalogsearch/result/?q=11880" target="_blank">Beginner Metal Guitar</a>, Lesson 6, Exs 64. This exercise makes uses of palm muting.</p> <p><a href="https://www.learntoplaymusic.com/blog/wp-content/uploads/2014/10/11880_06400.png"><img class="alignnone wp-image-22442 size-medium" src="https://www.learntoplaymusic.com/blog/wp-content/uploads/2014/10/11880_06400-300x195.png" alt="11880_06400" width="300" height="195" /></a></p> <p>Here is the video for this example:</p> <p style="text-align: center"><div style="max-width:630px;max-height:350px;"><div class="video-shortcode"><iframe title="YouTube video player" width="630" height="350" src="http://www.youtube.com/embed/_GX_QaIAjL4?wmode=transparent" frameborder="0" allowfullscreen></iframe></div></div><br /> From <a href="https://www.learntoplaymusic.com/catalogsearch/result/?q=11880" target="_blank">Beginner Metal Guitar</a>, Lesson 7, Exs 75 &#8211; This exercise makes use of the Natural Minor Scale (Aeolian Mode), one of the 7 modes.</p> <p><a href="https://www.learntoplaymusic.com/blog/wp-content/uploads/2014/10/11880-07500.png"><img class="alignnone size-full wp-image-22443" src="https://www.learntoplaymusic.com/blog/wp-content/uploads/2014/10/11880-07500.png" alt="11880-07500" width="943" height="370" /></a></p> <p>Here is the video for this example:</p> <p style="text-align: center"><div style="max-width:630px;max-height:350px;"><div class="video-shortcode"><iframe title="YouTube video player" width="630" height="350" src="http://www.youtube.com/embed/4HI0MEfQbOE?wmode=transparent" frameborder="0" allowfullscreen></iframe></div></div><br /> From <a href="https://www.learntoplaymusic.com/catalogsearch/result/?q=11880" target="_blank">Beginner Metal Guitar</a>, Lesson 9, Exs 105 &#8211; This exercise makes use of tapping, pull-offs and hammer-ons.</p> <p><a href="https://www.learntoplaymusic.com/blog/wp-content/uploads/2014/10/11880-10500_1.png"><img class="alignnone size-full wp-image-22444" src="https://www.learntoplaymusic.com/blog/wp-content/uploads/2014/10/11880-10500_1.png" alt="11880-10500_1" width="943" height="381" /></a> <a href="https://www.learntoplaymusic.com/blog/wp-content/uploads/2014/10/11880-10500_2.png"><img class="alignnone size-full wp-image-22445" src="https://www.learntoplaymusic.com/blog/wp-content/uploads/2014/10/11880-10500_2.png" alt="11880-10500_2" width="943" height="360" /></a></p> <p>Here is the video for this example:</p> <p style="text-align: center"><div style="max-width:630px;max-height:350px;"><div class="video-shortcode"><iframe title="YouTube video player" width="630" height="350" src="http://www.youtube.com/embed/QFyj-SgidHI?wmode=transparent" frameborder="0" allowfullscreen></iframe></div></div></p> <h2><b>Further Guitar Shred Information</b></h2> <p>If you found this article interesting and would like further information and insights, definitely check out <a href="https://www.learntoplaymusic.com/blog/guitar-shredding-david-dowling/" target="_blank">Music Space Episode 12: Guitar Shredding with David Dowling</a>.</p> <h3><strong>Who is LearnToPlayMusic.com</strong></h3> <p><a href="https://www.learntoplaymusic.com" target="_blank">LearnToPlayMusic.com</a> is the world’s leading music education innovator and publisher of print, eBooks, apps and online lessons.</p> <p>&#8211; Continue learning with Learn To Play Music at <a href="https://www.learntoplaymusic.com" target="_blank">LearnToPlayMusic.com</a></p> <p>The post <a rel="nofollow" href="https://www.learntoplaymusic.com/blog/shred-guitar-blazing-fretboards/">Shred Guitar: The Art of Blazing Fretboards</a> appeared first on <a rel="nofollow" href="https://www.learntoplaymusic.com/blog">Learn To Play Music Blog</a>.</p> ]]>
</content:encoded>
<wfw:commentRss>https://www.learntoplaymusic.com/blog/shred-guitar-blazing-fretboards/feed/</wfw:commentRss>
<slash:comments>3</slash:comments>
</item>
<item>
<title>How to Play Guitar Chords: Tips on Getting a Good Sound</title>
<link>https://www.learntoplaymusic.com/blog/play-guitar-chords-tips-getting-good-sound/</link>
<comments>https://www.learntoplaymusic.com/blog/play-guitar-chords-tips-getting-good-sound/#comments</comments>
<pubDate>Thu, 16 Oct 2014 00:00:09 +0000</pubDate>
<dc:creator>
<![CDATA[ LTP Editor ]]>
</dc:creator>
<category>
<![CDATA[ Guitar ]]>
</category>
<guid isPermaLink="false">https://www.learntoplaymusic.com/blog/?p=22370</guid>
<description>
<![CDATA[ <p>How To Make Ordinary Guitar Chords Sound Great Picture yourself in this scenario: You’ve been learning guitar for a few months and you’re sitting in a room on a cold, bleak day holding a cheap acoustic [&#8230;]</p> <p>The post <a rel="nofollow" href="https://www.learntoplaymusic.com/blog/play-guitar-chords-tips-getting-good-sound/">How to Play Guitar Chords: Tips on Getting a Good Sound</a> appeared first on <a rel="nofollow" href="https://www.learntoplaymusic.com/blog">Learn To Play Music Blog</a>.</p> ]]>
</description>
<content:encoded>
<![CDATA[ <h1><b>How To Make Ordinary Guitar Chords Sound Great</b></h1> <p>Picture yourself in this scenario: You’ve been learning guitar for a few months and you’re sitting in a room on a cold, bleak day holding a cheap acoustic guitar with old strings that are too high above the fretboard. It’s literally painful to play and the resulting sound is hardly inspiring. Hopefully it’s all “up” from here? It certainly can be!</p> <p>In an ideal world, here’s what you can do:</p> <ol> <li>Invest in a good electronic tuner and make sure the guitar is well tuned. Tuners can be bought as a standalone device from music stores, or as a smartphone app. We recommend <a href="https://itunes.apple.com/au/app/cleartune-chromatic-tuner/id286799607?mt=8" target="_blank">Cleartune</a>, by BitCount (Android/iOS). Make it a priority to keep your guitar in tune and listen carefully to it. If a string sounds even slightly out of tune, question it and double check.</li> <li>Invest in a better instrument. Cheap guitars and older instruments have poor intonation and will not tune well, no matter how good you are. Understandably, it is not always easy for those on a budget, however even a reasonably affordable, brand new instrument will be a worthwhile upgrade, provided it is not bought from a bargain bin, second-hand, or as part of a cheap guitar package.</li> <li>If your strings are too high above the fretboard (this distance is called &#8216;action&#8217;) then consider having your instrument adjusted professionally at a guitar repair/servicing store. This will make the guitar much more comfortable to fret notes and play.</li> </ol> <p><b><a href="https://www.learntoplaymusic.com/blog/wp-content/uploads/2014/10/acoustic_chords.jpg"><img class="alignnone size-full wp-image-22394" src="https://www.learntoplaymusic.com/blog/wp-content/uploads/2014/10/acoustic_chords.jpg" alt="acoustic_chords" width="1200" height="820" /></a></b></p> <h2><strong>Upgrade Your Guitar Chords Technique!</strong></h2> <p>Granted, practice is a big part of what learning the guitar is about. However, if you have been playing for a few years and are still not satisfied with the sounds you’re getting then make sure you&#8217;re observing the following:</p> <ol> <li>Make sure your fretting fingers are placed just behind the fret for each note of the chord.</li> <li>Place just enough pressure on the string to avoid buzzing. Too much pressure can cause the string to go slightly sharp and you’ll sound out of tune.</li> <li>Many guitarists make the mistake of not listening to every note of the chord. Play each note individually before strumming, to be sure they can be heard. The more you do this, the more your fretting hand will find the optimal position for each finger and you’ll build muscle-memory.</li> <li>Use a heavy pick. A heavier pick will encourage better technique, greater volume and fuller tone, since it gives more resistance against each string. This forces your strumming/ picking hand to use greater accuracy when strumming &amp; picking. The thickness of the pick will allow for greater volume, while your tone will not sound thin or “plastic-y” as is common with light picks.</li> <li>Your strumming hand should use wrist-motion, not arm-motion. You’ll be able to play faster and gain greater control this way.</li> <li>Practice strumming the guitar quietly and loudly. When playing in general, strum moderately loud, so that you’re projecting well.</li> <li>Strum gently, but consistently. Smoothly brush the pick across the strings, but not too slowly. Avoid digging in and &#8216;crunching&#8217; them together or creating so much movement that the strings vibrate against the fretboard. With practice, a gentle but consistent strumming motion can still generate decent volume, so don’t be concerned that it won’t be loud enough. This will ease tension on your muscles as well.</li> </ol> <h2><b>Guitar Chords to Try!<br /> </b></h2> <p>Let’s take a simple chord progression like this:</p> <p><a href="https://www.learntoplaymusic.com/blog/wp-content/uploads/2014/10/69069-04500.png"><img class="alignnone size-full wp-image-22371" src="https://www.learntoplaymusic.com/blog/wp-content/uploads/2014/10/69069-04500.png" alt="69069-04500" width="945" height="176" /></a></p> <p>Here are a few ways to make this progression sound sweet to the ears. Use open guitar chords for this exercise.</p> <ol> <li>Bar 1 &#8211; strum the G chord, observing all that was said above in the Technique section. It should be sounding bright, loud and clear.</li> <li>Do the same for the Em chord. When you reach C, make sure you strum only the top 5 strings. It will sound much cleaner than strumming all six strings, as the bass note of the chord will be a C (the same as the chord name) rather than an E. To help you achieve this, place your third finger (which is currently on the lowest note of the C chord) in a position where it slightly mutes the bottom string. The edge of your fingertip need only touch the bottom string to do this.</li> <li>Lastly play the D7 chord on the top 4 strings only, using the same root-note principle as with the C chord. It would be possible to play the 5th string as well and still have a regular D7 chord, but because the lowest note is then an A instead of D, the chord is not as clean and defined. Practice strumming only the top 4 strings.</li> </ol> <h2><strong>Where To From Here?</strong></h2> <p>Contrary to what you might think, the open chords (within the first 5 frets) are some of the best sounding chords you will ever learn. The famous American guitarist Chet Atkins once joked, <em>“Don’t play above the fifth fret… there’s no money there.”</em> The open chords do have a particularly strong sound to them and are well suited to sustained rhythm playing and fingerpicking. Here are some more ways this progression can be brought to life:</p> <ol> <li>Using a pick, slowly and evenly play the lowest note of each chord (G, E, C and D respectively) followed by the top 3 strings, in the order of 3, 2, 1, 2, 3, repeated twice in each bar. For example, the first chord would be played as low G (6th string) followed by strings 3, 2, 1, 2, 3. Repeat that chord before moving to low E, followed by 3, 2, 1, 2, 3 etc. Make sure each note is loud and clear. It should create a nice arpeggio effect.</li> <li>Pick each note loud and clear and let them ring as long as you can before the next chord change. This can be used to add dramatic effect on ballads and fingerpicked music.</li> <li>Try different <em>voicings</em> of these chords, such as the ones suggested below. Over time you’ll learn more voicings and substitutions which can spice up a chord progression. Try the following, using the same picking pattern:</li> </ol> <p><a href="https://www.learntoplaymusic.com/blog/wp-content/uploads/2014/10/69069-04500_alt.png"><img class="alignnone size-full wp-image-22414" src="https://www.learntoplaymusic.com/blog/wp-content/uploads/2014/10/69069-04500_alt.png" alt="69069-04500_alt" width="1239" height="223" /></a></p> <p><a href="https://www.learntoplaymusic.com/blog/wp-content/uploads/2014/10/G-alt-voicing.png"><img class="alignnone wp-image-22412" src="https://www.learntoplaymusic.com/blog/wp-content/uploads/2014/10/G-alt-voicing-172x300.png" alt="G-alt-voicing" width="110" height="191" /></a><a href="https://www.learntoplaymusic.com/blog/wp-content/uploads/2014/10/Em7.png"><img class="alignnone wp-image-22411" src="https://www.learntoplaymusic.com/blog/wp-content/uploads/2014/10/Em7-172x300.png" alt="Em7" width="110" height="191" /></a><a href="https://www.learntoplaymusic.com/blog/wp-content/uploads/2014/10/Cadd9.png"><img class="alignnone wp-image-22408" src="https://www.learntoplaymusic.com/blog/wp-content/uploads/2014/10/Cadd9-172x300.png" alt="Cadd9" width="110" height="191" /></a><a href="https://www.learntoplaymusic.com/blog/wp-content/uploads/2014/10/Dsus.png"><img class="alignnone wp-image-22410" src="https://www.learntoplaymusic.com/blog/wp-content/uploads/2014/10/Dsus-172x300.png" alt="Dsus" width="110" height="191" /></a><a href="https://www.learntoplaymusic.com/blog/wp-content/uploads/2014/10/D.png"><img class="alignnone wp-image-22409" src="https://www.learntoplaymusic.com/blog/wp-content/uploads/2014/10/D-172x300.png" alt="D" width="110" height="191" /></a></p> <p>&nbsp;</p> <h3><strong><br /> Who is LearnToPlayMusic.com</strong></h3> <p><a href="https://www.learntoplaymusic.com" target="_blank">LearnToPlayMusic.com</a> is the world’s leading music education innovator and publisher of print, eBooks, apps and online lessons.</p> <p>&#8211; Continue learning with Learn To Play Music at <a href="https://www.learntoplaymusic.com" target="_blank">LearnToPlayMusic.com</a></p> <p>The post <a rel="nofollow" href="https://www.learntoplaymusic.com/blog/play-guitar-chords-tips-getting-good-sound/">How to Play Guitar Chords: Tips on Getting a Good Sound</a> appeared first on <a rel="nofollow" href="https://www.learntoplaymusic.com/blog">Learn To Play Music Blog</a>.</p> ]]>
</content:encoded>
<wfw:commentRss>https://www.learntoplaymusic.com/blog/play-guitar-chords-tips-getting-good-sound/feed/</wfw:commentRss>
<slash:comments>14</slash:comments>
</item>
<item>
<title>Why You Should Learn to Play the Tin Whistle</title>
<link>https://www.learntoplaymusic.com/blog/learn-play-tin-whistle/</link>
<comments>https://www.learntoplaymusic.com/blog/learn-play-tin-whistle/#comments</comments>
<pubDate>Tue, 14 Oct 2014 05:33:49 +0000</pubDate>
<dc:creator>
<![CDATA[ LTP Editor ]]>
</dc:creator>
<category>
<![CDATA[ Tin Whistle ]]>
</category>
<guid isPermaLink="false">https://www.learntoplaymusic.com/blog/?p=22636</guid>
<description>
<![CDATA[ <p>Why Should I Learn to Play the Tin Whistle? Ever thought about playing an instrument? Sure, there are common-place instruments such as the piano, guitar, drums and vocals… but why not look at something a [&#8230;]</p> <p>The post <a rel="nofollow" href="https://www.learntoplaymusic.com/blog/learn-play-tin-whistle/">Why You Should Learn to Play the Tin Whistle</a> appeared first on <a rel="nofollow" href="https://www.learntoplaymusic.com/blog">Learn To Play Music Blog</a>.</p> ]]>
</description>
<content:encoded>
<![CDATA[ <h2><strong>Why Should I Learn to Play the Tin Whistle?</strong></h2> <p>Ever thought about playing an instrument? Sure, there are common-place instruments such as the piano, guitar, drums and vocals… but why not look at something a little different such as the <strong>Tin Whistle</strong>? The tin whistle is a woodwind instrument, containing six holes and is relatively easy to play. It is often heard in celtic and folk music. If this instrument sounds like it&#8217;s for you, here’s how you can get started in this post.</p> <h2><strong>Choosing the Correct Tin Whistle</strong></h2> <p>Make sure you have a tin whistle tuned in the key of D, (your tin whistle should have the letter D written on it). This is the most common type of tin whistle. If you are unsure about whether your whistle is tuned to D, check with the staff at your local music store.</p> <h2><strong>How to Hold The Tin Whistle</strong></h2> <p>There are six holes on the tin whistle. The first three fingers of each hand are used to cover the holes. The little fingers are not used by either hand. Different notes are produced by covering various combinations of these holes as you blow through the instrument. The following photo demonstrates the basic playing position. Notice that the left hand is above the right.</p> <p><a href="https://www.learntoplaymusic.com/blog/wp-content/uploads/2014/10/Female-Playing-Front-01.jpg"><img class="aligncenter wp-image-22637 size-medium" src="https://www.learntoplaymusic.com/blog/wp-content/uploads/2014/10/Female-Playing-Front-01-224x300.jpg" alt="Female-Playing-Front-01" width="224" height="300" /></a></p> <h2><strong>Understanding the Tin Whistle Diagrams</strong></h2> <p>The numbers on the fingers show which fingers should be used to cover the holes as demonstrated in the previous photo.</p> <p><a href="https://www.learntoplaymusic.com/blog/wp-content/uploads/2014/10/69262-005-bv01-en-us.jpg"><img class="alignnone size-medium wp-image-22638" src="https://www.learntoplaymusic.com/blog/wp-content/uploads/2014/10/69262-005-bv01-en-us-284x300.jpg" alt="69262-005-bv01-en-us" width="284" height="300" /></a><a href="https://www.learntoplaymusic.com/blog/wp-content/uploads/2014/10/69262-005-bv02-en-us.jpg"><img class="alignnone size-medium wp-image-22639" src="https://www.learntoplaymusic.com/blog/wp-content/uploads/2014/10/69262-005-bv02-en-us-284x300.jpg" alt="69262-005-bv02-en-us" width="284" height="300" /></a></p> <p>The following photo shows a B note. This is produced by covering the top hole with the first finger of your left hand. In the photo this is indicated by a white number inside a red circle, covering the hole. The notation for this note is shown further below.</p> <p><a href="https://www.learntoplaymusic.com/blog/wp-content/uploads/2014/10/69262-005-bv03-en-us.jpg"><img class="aligncenter wp-image-22641 size-medium" src="https://www.learntoplaymusic.com/blog/wp-content/uploads/2014/10/69262-005-bv03-en-us-291x300.jpg" alt="69262-005-bv03-en-us" width="291" height="300" /></a></p> <h2><strong>Playing Your First Note on the Tin Whistle</strong></h2> <p>The first note you will learn to play is the B note, shown above. Place your fingers in position to play the note and put the tip of the mouthpiece into your mouth. Use your lips to seal off any air from escaping out the sides of your mouth and blow smoothly and steadily into the tin whistle. Don’t blow too hard or start the note too suddenly, or you may cause the note to sound at the wrong pitch or cause the instrument to squeak.</p> <h2><strong>Tonguing</strong></h2> <p>To control the beginning and end of a note, the technique of tonguing is used. To prepare for this technique whisper the sound &#8220;taa&#8221;. The sound begins with your tongue sitting behind your top teeth, blocking the passage of air, and you make the &#8220;taa&#8221; sound by quickly withdrawing it, letting a stream of air begin from your outgoing breath.</p> <p>The next step is to practice this with the tin whistle in position to play a B note, with your tongue lightly on the hole in the mouthpiece. As you withdraw your tongue, the note will have a well articulated beginning. The &#8220;t&#8221; part of the sound gives the note a definite starting point, and the &#8220;aa&#8221; part of the sound keeps your throat open so that the flow of air remains constant and the note sounds even. To end the note, you put your tongue back on the mouthpiece rather than stopping your breath. This will end the note as crisply as it started. It is worth practicing the tonguing technique many times on a single note until you are comfortable with it.</p> <p><a href="https://www.learntoplaymusic.com/blog/wp-content/uploads/2014/10/the_note_b.png"><img class="alignnone size-full wp-image-22643" src="https://www.learntoplaymusic.com/blog/wp-content/uploads/2014/10/the_note_b.png" alt="the_note_b" width="547" height="232" /></a></p> <h2><strong>Breathing technique When Playing the Tin Whistle</strong></h2> <p>When learning any wind instrument, it is important to learn how to take a new breath without losing your timing. Breath marks are indicated in the following exercise by the large comma-shaped symbol. Take a quick, deep breath, and be careful not to lose your timing when you breathe. Counting as you play should help you become more confident with this. The correct breathing technique is discussed in detail in Lesson 6 of our <a href="https://www.learntoplaymusic.com/catalogsearch/result/?q=69262" target="_blank">Progressive Tin Whistle</a> book.</p> <p>If you look at the following example, you will notice a line of letters and symbols above the staff (Em, B7, Em, etc.) These are chord symbols which indicate the harmony to be played by accompanying instruments such as keyboard or guitar. The chord symbols do not affect the notes you play on the tin whistle. You will also notice the counting numbers underneath the staff. The bigger bold numbers tell you to play a note and the smaller numbers tell you to sustain it until the next note.</p> <p><a href="https://www.learntoplaymusic.com/blog/wp-content/uploads/2014/10/69262_exs_01.png"><img class="alignnone size-full wp-image-22644" src="https://www.learntoplaymusic.com/blog/wp-content/uploads/2014/10/69262_exs_01.png" alt="69262_exs_01" width="653" height="292" /></a></p> <p>Listen to this audio example to hear how the exercise above should be played. Once you&#8217;re confident, try playing along with the backing track supplied beneath it.</p> <div class="audio"> <div style="border:1px solid #666;width:100%px;height:50px;"> <div id="container1F">You need <a href="http://get.adobe.com/flashplayer/">Flash Player 9 or later</a> installed to play this s3audio</div> <p> <script type="text/javascript"> jwplayer('container1F').setup( { 'id': 'container1F', 'wmode': 'transparent', 'icons': 'true', 'allowscriptaccess': 'always', 'allownetworking': 'all', 'file': 'https://ltp-us-cloudfront-source.s3.amazonaws.com/aud/cat/69262-old/69262-00100_FM.mp3', 'width': '100%', 'height': '50', 'allowfullscreen': 'false', 'autostart': 'false', 'controlbar': 'bottom', 'dock': 'true', 'abouttext': 'S3Media Stream 5.6.6', 'aboutlink': 'http://www.wp21century.com', 'skin':'https://www.learntoplaymusic.com/blog/wp-content/plugins/s3mediastream-video/skins/beelden/beelden.xml', 'image':'https://dur3da0b6fjvs.cloudfront.net/img/com/poster-audio_player.jpg', 'plugins': { }, 'modes': [ {type: 'flash', src: 'https://www.learntoplaymusic.com/blog/wp-content/plugins/s3mediastream-video/mediaplayer/player.swf'}, { type: 'html5', config: { 'file': 'https://ltp-us-cloudfront-source.s3.amazonaws.com/aud/cat/69262-old/69262-00100_FM.mp3', 'provider': 'sound' } }, { type: 'download', config: { 'file': 'https://ltp-us-cloudfront-source.s3.amazonaws.com/aud/cat/69262-old/69262-00100_FM.mp3', 'provider': 'sound' } } ] }); </script> </div> <p> <!-- End S3Media Stream script --></p> <p class="media_txt">Audio &#8211; Full Mix</p> </div> <div class="audio"> <div style="border:1px solid #666;width:100%px;height:50px;"> <div id="container1B">You need <a href="http://get.adobe.com/flashplayer/">Flash Player 9 or later</a> installed to play this s3audio</div> <p> <script type="text/javascript"> jwplayer('container1B').setup( { 'id': 'container1B', 'wmode': 'transparent', 'icons': 'true', 'allowscriptaccess': 'always', 'allownetworking': 'all', 'file': 'https://ltp-us-cloudfront-source.s3.amazonaws.com/aud/cat/69262-old/69262-00100_BM.mp3', 'width': '100%', 'height': '50', 'allowfullscreen': 'false', 'autostart': 'false', 'controlbar': 'bottom', 'dock': 'true', 'abouttext': 'S3Media Stream 5.6.6', 'aboutlink': 'http://www.wp21century.com', 'skin':'https://www.learntoplaymusic.com/blog/wp-content/plugins/s3mediastream-video/skins/beelden/beelden.xml', 'image':'https://dur3da0b6fjvs.cloudfront.net/img/com/poster-audio_player.jpg', 'plugins': { }, 'modes': [ {type: 'flash', src: 'https://www.learntoplaymusic.com/blog/wp-content/plugins/s3mediastream-video/mediaplayer/player.swf'}, { type: 'html5', config: { 'file': 'https://ltp-us-cloudfront-source.s3.amazonaws.com/aud/cat/69262-old/69262-00100_BM.mp3', 'provider': 'sound' } }, { type: 'download', config: { 'file': 'https://ltp-us-cloudfront-source.s3.amazonaws.com/aud/cat/69262-old/69262-00100_BM.mp3', 'provider': 'sound' } } ] }); </script> </div> <p> <!-- End S3Media Stream script --></p> <p class="media_txt">Audio &#8211; Backing Mix</p> </div> <p>We hope you have enjoyed this short introduction to the tin whistle. Wishing you well, whichever instrument you should choose to learn!</p> <h3><strong><br /> Who is LearnToPlayMusic.com</strong></h3> <p><a href="https://www.learntoplaymusic.com" target="_blank">LearnToPlayMusic.com</a> is the world’s leading music education innovator and publisher of print, eBooks, apps and online lessons.</p> <p>&#8211; Continue learning with Learn To Play Music at <a href="https://www.learntoplaymusic.com" target="_blank">LearnToPlayMusic.com</a></p> <p>The post <a rel="nofollow" href="https://www.learntoplaymusic.com/blog/learn-play-tin-whistle/">Why You Should Learn to Play the Tin Whistle</a> appeared first on <a rel="nofollow" href="https://www.learntoplaymusic.com/blog">Learn To Play Music Blog</a>.</p> ]]>
</content:encoded>
<wfw:commentRss>https://www.learntoplaymusic.com/blog/learn-play-tin-whistle/feed/</wfw:commentRss>
<slash:comments>2</slash:comments>
</item>
<item>
<title>All About the Electric Acoustic Guitar</title>
<link>https://www.learntoplaymusic.com/blog/electric-acoustic-guitar/</link>
<comments>https://www.learntoplaymusic.com/blog/electric-acoustic-guitar/#comments</comments>
<pubDate>Thu, 09 Oct 2014 06:03:43 +0000</pubDate>
<dc:creator>
<![CDATA[ LTP Editor ]]>
</dc:creator>
<category>
<![CDATA[ Guitar ]]>
</category>
<guid isPermaLink="false">https://www.learntoplaymusic.com/blog/?p=22358</guid>
<description>
<![CDATA[ <p>What is an Electric Acoustic Guitar? An electric acoustic guitar is any standard acoustic guitar that includes a pickup system or on-board microphone. This allows the guitar to be connected to an amplifier and therefore [&#8230;]</p> <p>The post <a rel="nofollow" href="https://www.learntoplaymusic.com/blog/electric-acoustic-guitar/">All About the Electric Acoustic Guitar</a> appeared first on <a rel="nofollow" href="https://www.learntoplaymusic.com/blog">Learn To Play Music Blog</a>.</p> ]]>
</description>
<content:encoded>
<![CDATA[ <h2><b>What is an Electric Acoustic Guitar?</b></h2> <p>An electric acoustic guitar is any standard acoustic guitar that includes a pickup system or on-board microphone. This allows the guitar to be connected to an amplifier and therefore played through a speaker or PA system.</p> <h2><b>Why Use an Electric Acoustic Guitar?</b></h2> <p>Whether you play a classical guitar with nylon strings or a full-sized, steel-string instrument or something in between, any acoustic guitar can be fitted with a pickup system if needed. The advantage of using an electric acoustic may seem obvious; the ability to amplify your instrument without the need for a separate microphone. So why else might you consider using an electric acoustic? The answer is <i>versatility </i>and<i> consistency</i>.</p> <p>With a pickup system built in to your instrument, the guitar can be plugged directly into an amplifier or mixing console. Using the guitar in this manner enables a consistent tonal output from the instrument, making it easier to control in live situations. This is very helpful if you are touring, since you might not always have adequate time to tweak the sound of a separate microphone before the show.</p> <p>The use of a regular microphone would also need to factor in the microphone type (e.g., condenser, dynamic), microphone brand, polar pattern and positioning, small movements by the guitarist which affect the sound, amount of gain achievable before feedback, not to mention bleed from other acoustic sources on stage. It is certainly possible to get a great, if not better sound with a good microphone and positioning, plus a venue with a decent PA system and acoustics. However with a pickup system, you have the freedom to move around on stage, plus the sound of the guitar’s pickup output is easier to control at higher volumes, so it is much more practical.</p> <p><a href="https://www.learntoplaymusic.com/blog/wp-content/uploads/2014/10/acoustic_pickup_controls.jpg"><img class="alignnone size-full wp-image-22391" src="https://www.learntoplaymusic.com/blog/wp-content/uploads/2014/10/acoustic_pickup_controls.jpg" alt="acoustic_pickup_controls" width="1200" height="801" /></a></p> <h2><b>Types of Pickup Systems</b></h2> <p>There are 3 main ways to amplify your acoustic guitar without the use of a regular microphone. The most common method is to use a piezo-electric transducer, which sits under the saddle of the strings, at the bridge. This requires an on-board preamp and power source, typically from a 9V battery. A second method is to use a regular magnetic <i>bar-shaped</i> pickup (similar to an electric guitar pickup) which is designed to mount under the strings, at the soundhole. This is very easy, since it requires no alteration to the guitar. The third method is to install a small electret condenser microphone inside the guitar. Manufacturers also offer combination pickup units, such as the <a href="http://www.maton.com.au/product/ap5-pro-pickup" target="_blank">Maton AP-5 Pro</a>, which includes a piezo under-saddle unit and an internal mic, or the <a href="http://www.seymourduncan.com/acoustic/mag-mic.php" target="_blank">Seymour Duncan Mag Mic</a> which combines a magnetic pickup with an internal mic. Nowadays, acoustic players will often customize their guitars to get a blend of two or even three of these pickup types, which means the guitar itself will have multiple outputs.</p> <p><a href="https://www.learntoplaymusic.com/blog/wp-content/uploads/2014/10/acoustic_cable.jpg"><img class="alignnone size-full wp-image-22389" src="https://www.learntoplaymusic.com/blog/wp-content/uploads/2014/10/acoustic_cable.jpg" alt="acoustic_cable" width="1200" height="801" /></a></p> <h2><b>Issues To Be Aware Of</b></h2> <p>Guitars fitted with a preamp system require power, normally from a 9V battery. The battery doesn’t need replacing very often, but it’s a good idea to carry a spare just in case.</p> <p>Secondly, the natural tone of your guitar will be compromised a little by most direct pickup systems. This is considered a small price to pay for the advantages of using one in live situations, however in the recording studio it is a common practice to mic the instrument as well as record the pickup output (through a D.I. box), giving the engineer several options for recording the best possible sound.</p> <p>At higher volumes, feedback can also become an issue, regardless of whether you use a pickup or a microphone. If relying on a pickup, you can help reduce the problem by using a <i>feedback buster</i>, which is essentially a rubber plug that fits into the soundhole.</p> <h2><b>Choosing an Acoustic Pickup<br /> </b></h2> <p>There is no easy answer to this, as it depends on how you play, what kind of acoustic guitar you have and what kind of sound you’re after. Do some research online, including watching and listening to video demonstrations of pickups. Here’s our recommendation: if you are considering an upgrade and already own a great acoustic guitar that you have no plans on retiring, then it would be worthwhile having a pickup system fitted to that instrument. If you have an average or below-average instrument, consider purchasing an electric acoustic, as the pickups will be factory-installed, tested and optimized for that instrument. When testing an electric acoustic guitar, listen carefully &#8211; does the amplified sound clearly resemble a bigger, louder version of what is coming from the soundhole? For most people that should be the aim &#8211; a louder, but natural sound. To get you started in your research, some well known acoustic pickup manufacturers include <a href="http://www.maton.com.au" target="_blank">Maton Guitars</a>, <a href="http://www.seymourduncan.com/acoustic/" target="_blank">Seymour Duncan</a>, <a href="http://www.fishman.com/products/for/acoustic-guitar" target="_blank">Fishman</a>, <a href="http://www.b-band.com/" target="_blank">B-Band</a> and <a href="http://www.lrbaggs.com/" target="_blank">LR Baggs</a>.</p> <h3><strong><br /> Who is LearnToPlayMusic.com</strong></h3> <p><a href="https://www.learntoplaymusic.com" target="_blank">LearnToPlayMusic.com</a> is the world’s leading music education innovator and publisher of print, eBooks, apps and online lessons.</p> <p>&#8211; Continue learning with Learn To Play Music at <a href="https://www.learntoplaymusic.com" target="_blank">LearnToPlayMusic.com</a></p> <p>The post <a rel="nofollow" href="https://www.learntoplaymusic.com/blog/electric-acoustic-guitar/">All About the Electric Acoustic Guitar</a> appeared first on <a rel="nofollow" href="https://www.learntoplaymusic.com/blog">Learn To Play Music Blog</a>.</p> ]]>
</content:encoded>
<wfw:commentRss>https://www.learntoplaymusic.com/blog/electric-acoustic-guitar/feed/</wfw:commentRss>
<slash:comments>18</slash:comments>
</item>
<item>
<title>Upgrading Your Electric Guitar Pickups: Pros and Cons</title>
<link>https://www.learntoplaymusic.com/blog/upgrading-electric-guitar-pickups-pros-cons/</link>
<comments>https://www.learntoplaymusic.com/blog/upgrading-electric-guitar-pickups-pros-cons/#comments</comments>
<pubDate>Tue, 07 Oct 2014 06:10:54 +0000</pubDate>
<dc:creator>
<![CDATA[ LTP Editor ]]>
</dc:creator>
<category>
<![CDATA[ Guitar ]]>
</category>
<guid isPermaLink="false">https://www.learntoplaymusic.com/blog/?p=22204</guid>
<description>
<![CDATA[ <p>Why Change or Upgrade Your Guitar Pickups? Most guitar players will probably never feel the need to change pickups, and this is fine. However an experienced player who is looking for specific tones will certainly find it worthwhile. A [&#8230;]</p> <p>The post <a rel="nofollow" href="https://www.learntoplaymusic.com/blog/upgrading-electric-guitar-pickups-pros-cons/">Upgrading Your Electric Guitar Pickups: Pros and Cons</a> appeared first on <a rel="nofollow" href="https://www.learntoplaymusic.com/blog">Learn To Play Music Blog</a>.</p> ]]>
</description>
<content:encoded>
<![CDATA[ <h2><b>Why Change or Upgrade Your Guitar Pickups?</b></h2> <p>Most guitar players will probably never feel the need to change pickups, and this is fine. However an experienced player who is looking for specific tones will certainly find it worthwhile. A guitarist’s tone is largely the result of what their fingers are doing and how they physically play their instrument. However, pickup choices do have some bearing, as do the amplifier and the guitar itself. Pickup manufacturers normally provide a description of each pickup in their catalog, and most now have recorded samples online.</p> <h2><b>What are Guitar Pickups?</b></h2> <p>Guitar pickups are essentially a microphone which responds to the vibration of strings by converting the acoustic energy they create into an electrical signal, which is then sent to an amplifier. On any electric guitar the pickup is mounted under the strings, between the bridge and the start of the fretboard.</p> <h2><b>Types of Guitar Pickups</b></h2> <p>The two main kinds of electric guitar pickup you’ll encounter are the <i>single coil</i> and the <i>humbucker</i>. There are numerous guitar pickup manufacturers out there and literally hundreds of pickups on the market &#8211; all of which are based upon these two designs. Much could be said about the differences between them, such as the magnetic materials used, the wiring, number of windings and spacing, but for simplicity we’ll focus on the practical differences to be aware of. One major difference is that single coil pickups create electrical noise, because they act like a small antenna and are susceptible to mains interference and radio. A humbucking design avoids this problem, hence the term <i>hum-bucker</i>. The main defining features of each guitar pickup are listed in the table below:</p> <p><a href="https://www.learntoplaymusic.com/blog/wp-content/uploads/2014/09/pickups_table.png"><img class="aligncenter wp-image-22205 size-full" src="https://www.learntoplaymusic.com/blog/wp-content/uploads/2014/09/pickups_table.png" alt="Guitar Pickups: Single Coil vs Humbucker" width="629" height="467" /></a></p> <h2><b>Guitar Pickup Configurations</b></h2> <p>Electric guitars can come with a mix of humbuckers and single coils or simply one type. This is called the pickup configuration. Famous guitars such as the Fender Stratocaster (<em>shown below)</em> come with 3 single coil pickups as standard (S-S-S). The Gibson Les Paul comes with two humbuckers (H-H).</p> <p><a href="https://www.learntoplaymusic.com/blog/wp-content/uploads/2014/09/strat.jpg"><img class="aligncenter wp-image-22239 size-full" src="https://www.learntoplaymusic.com/blog/wp-content/uploads/2014/09/strat.jpg" alt="strat guitar pickups" width="1200" height="668" /></a></p> <p>Dozens of modern guitars are based upon a &#8216;Superstrat&#8217; design, which often uses an S-S-H configuration. This means a single coil for the neck and middle, and a humbucker in the bridge. The Blade RH-4 by Gary Levinson uses &#8216;stacked coil&#8217; pickups for the neck and middle (these are humbucking designs but look and sound more like a single coil), and a humbucker for the bridge. An S-S-H configuration allows for a combination of traditional stratocaster sounds and modern distorted tones on the same guitar. The Ibanez RG and JEM series<em> (as shown below)</em> mostly use a H-S-H configuration, giving two fat humbucker tones for the neck and bridge sound, while also allowing for a single coil middle-pickup tone, ideal for rhythm playing.</p> <p><a href="https://www.learntoplaymusic.com/blog/wp-content/uploads/2014/09/ibanez.jpg"><img class="aligncenter wp-image-22237 size-full" src="https://www.learntoplaymusic.com/blog/wp-content/uploads/2014/09/ibanez-e1411963357688.jpg" alt="ibanez guitar pickups" width="1200" height="800" /></a></p> <h2>In Conclusion</h2> <p>So why would someone want to upgrade a pickup? One reason is that cheaper pickups (e.g., stock pickups in cheaper instruments) can lack clarity, particularly with distorted tones. Even if your technique is good, the resulting sound may have a certain muddiness to it. Cheaper pickups also sometimes have a “woolly,” or hollow bass response, while better ones tend to be focused and retain clarity. Better pickups will often emphasize harmonics more, and give a pleasant, even sound to chords and lead playing. Many pickups are popular because of the qualities they possess, including the Seymour Duncan Alnico II Pro, EMG-81, and DiMarzio PAF-Pro. You may already have a great guitar with humbuckers but would prefer a single coil tone, or perhaps want to upgrade a humbucker to one that has a brighter tone. Or maybe the style of music you play could benefit from higher-output pickups? You could also be searching for a “sound” or trying to emulate the tone of your favorite artist. Finding out what pickups they use and switching over is one step you can take. The possibilites are endless.</p> <p>Popular pickup manufacturers include <a href="http://www.seymourduncan.com/" target="_blank">Seymour Duncan</a>, <a href="http://www.emgpickups.com/" target="_blank">EMG</a>, <a href="http://www.dimarzio.com/" target="_blank">DiMarzio</a>, <a href="http://www.lacemusic.com/" target="_blank">Lace</a>, <a href="http://www.billlawrence.com/" target="_blank">Bill Lawrence</a>, <a href="http://www.fralinpickups.com/" target="_blank">Lindy Fralin</a>, <a href="http://www.bartolini.net/" target="_blank">Bartolini</a>, <a href="http://www.kinman.com/index.php" target="_blank">Kinman</a>, <a href="http://jbepickups.com/" target="_blank">Joe Barden</a>, <a href="https://bareknucklepickups.co.uk/main/" target="_blank">Bareknuckle</a>, <a href="http://www.lollarguitars.com/mm5/merchant.mvc" target="_blank">Lollar</a>, <a href="http://www.fender.com/en-AU/guitar-bass-parts/pickups-and-preamps/" target="_blank">Fender</a> and <a href="http://store.gibson.com/pickups-and-electronics/" target="_blank">Gibson</a>. Check them out if you have opportunity &#8211; a world of tone awaits you!</p> <p style="text-align: center"><a href="https://www.learntoplaymusic.com/blog/wp-content/uploads/2014/09/tele_01.jpg"><img class="alignnone wp-image-22226" src="https://www.learntoplaymusic.com/blog/wp-content/uploads/2014/09/tele_01.jpg" alt="tele_01" width="231" height="500" /></a><a href="https://www.learntoplaymusic.com/blog/wp-content/uploads/2014/09/tele_02.jpg"><img class="alignnone wp-image-22227" src="https://www.learntoplaymusic.com/blog/wp-content/uploads/2014/09/tele_02.jpg" alt="tele_02" width="266" height="500" /></a></p> <address>A stock Fender Telecaster guitar (left) and the same instrument with modified pickups added (right).</address> <h3><strong><br /> Who is LearnToPlayMusic.com</strong></h3> <p><a href="https://www.learntoplaymusic.com" target="_blank">LearnToPlayMusic.com</a> is the world’s leading music education innovator and publisher of print, eBooks, apps and online lessons.</p> <p>&#8211; Continue learning with Learn To Play Music at <a href="https://www.learntoplaymusic.com" target="_blank">LearnToPlayMusic.com</a></p> <p>The post <a rel="nofollow" href="https://www.learntoplaymusic.com/blog/upgrading-electric-guitar-pickups-pros-cons/">Upgrading Your Electric Guitar Pickups: Pros and Cons</a> appeared first on <a rel="nofollow" href="https://www.learntoplaymusic.com/blog">Learn To Play Music Blog</a>.</p> ]]>
</content:encoded>
<wfw:commentRss>https://www.learntoplaymusic.com/blog/upgrading-electric-guitar-pickups-pros-cons/feed/</wfw:commentRss>
<slash:comments>5</slash:comments>
</item>
<item>
<title>Piano Tips: Improving Piano Hand Coordination</title>
<link>https://www.learntoplaymusic.com/blog/piano-tips-improving-piano-hand-coordination/</link>
<comments>https://www.learntoplaymusic.com/blog/piano-tips-improving-piano-hand-coordination/#comments</comments>
<pubDate>Tue, 07 Oct 2014 01:17:04 +0000</pubDate>
<dc:creator>
<![CDATA[ LTP Editor ]]>
</dc:creator>
<category>
<![CDATA[ Piano & Keyboard ]]>
</category>
<guid isPermaLink="false">https://www.learntoplaymusic.com/blog/?p=22280</guid>
<description>
<![CDATA[ <p>Piano Tips for Improving Piano Hand Coordination Today&#8217;s post looks at piano tips for improving piano hand coordination, including how to practice scales, playing with each hand individually and then playing with both hands together. [&#8230;]</p> <p>The post <a rel="nofollow" href="https://www.learntoplaymusic.com/blog/piano-tips-improving-piano-hand-coordination/">Piano Tips: Improving Piano Hand Coordination</a> appeared first on <a rel="nofollow" href="https://www.learntoplaymusic.com/blog">Learn To Play Music Blog</a>.</p> ]]>
</description>
<content:encoded>
<![CDATA[ <h2><strong>Piano Tips for Improving Piano Hand Coordination</strong></h2> <p>Today&#8217;s post looks at piano tips for improving piano hand coordination, including how to practice scales, playing with each hand individually and then playing with both hands together.</p> <h2><b>Practicing Piano Scales</b></h2> <p>As a piano player, it is essential to be able to play both single notes and chords equally well with both hands. A good way of developing strength and independence in all the fingers is to practice scales with each hand and then with both hands together. Various ways of playing the G major scale are shown below. First is the scale in the bass staff, to be played by the left hand. The first note is a low G note. Notice the fingering written under the music &#8211; a crossover is necessary when moving between D and E.</p> <h3><b>Piano Scale Exercise: Left Hand</b><br /> <a href="https://www.learntoplaymusic.com/blog/wp-content/uploads/2014/09/45.png"><img class="aligncenter wp-image-22283 size-full" src="https://www.learntoplaymusic.com/blog/wp-content/uploads/2014/09/45.png" alt="Piano Tips for piano hand coordination: Left Hand Piano Scale Exercise" width="956" height="288" /></a></h3> <p>Next, play the scale with both hands together (<em>as shown in the image below)</em>. Play slowly and listen carefully. Don’t rush! The most important thing is to play each note with both hands at exactly the same time, and to be sure all notes are even in length and volume. The crossovers occur at different times for each hand, so take care not to lose your timing at these points. Practicing playing a scale with both hands regularly and consistently will help you build up long term piano hand coordination.<br /> <b></b></p> <h3><b>Piano Scale Exercise: Both Hands</b></h3> <p><a href="https://www.learntoplaymusic.com/blog/wp-content/uploads/2014/09/46.png"><img class="aligncenter wp-image-22285 size-full" src="https://www.learntoplaymusic.com/blog/wp-content/uploads/2014/09/46.png" alt="Piano Tips for piano hand coordination: Both Hands Piano Scale Exercise" width="956" height="285" /></a></p> <p>Once you can play a scale smoothly and evenly with both hands together, the next step is to play it over more than one octave. The following example shows the G major scale played in eighth notes over two octaves. The first note of the second octave is played with the thumb (1). This necessitates thumb under and crossover techniques. Take them slowly at first and only increase the speed once it is totally comfortable.</p> <h3><b>Piano Scale Exercise: Both Hands Over Two Octaves</b></h3> <p><b><a href="https://www.learntoplaymusic.com/blog/wp-content/uploads/2014/09/47.png"><img class="aligncenter wp-image-22289 size-full" src="https://www.learntoplaymusic.com/blog/wp-content/uploads/2014/09/47.png" alt="Piano Tips for improving piano hand coordination: Piano Scale Exercise - Both Hands Over Two Octaves" width="956" height="299" /></a></b></p> <p>This final piece, &#8216;Changing Lanes&#8217; will put your scale practice to good use. The melody is played first by the left hand and then the right, the hands reverse roles every four bars!<b><br /> </b></p> <h3 style="text-align: center;"><strong>Changing Lanes</strong></h3> <p><a href="https://www.learntoplaymusic.com/blog/wp-content/uploads/2014/09/48_01.png"><img class="aligncenter wp-image-22287 size-full" src="https://www.learntoplaymusic.com/blog/wp-content/uploads/2014/09/48_01.png" alt="Piano Tips for improving piano hand coordination: Changing Lanes 1" width="953" height="335" /></a></p> <p><a href="https://www.learntoplaymusic.com/blog/wp-content/uploads/2014/09/48_02.png"><img class="aligncenter wp-image-22288 size-full" src="https://www.learntoplaymusic.com/blog/wp-content/uploads/2014/09/48_02.png" alt="Piano Tips for improving piano hand coordination: Changing Lanes 2" width="956" height="306" /></a></p> <p><a href="https://www.learntoplaymusic.com/blog/wp-content/uploads/2014/09/48_03.png"><img class="aligncenter wp-image-22290 size-full" src="https://www.learntoplaymusic.com/blog/wp-content/uploads/2014/09/48_03.png" alt="Piano Tips for improving piano hand coordination: Changing Lanes 3" width="957" height="313" /></a></p> <p><a href="https://www.learntoplaymusic.com/blog/wp-content/uploads/2014/09/48_04.png"><img class="aligncenter wp-image-22291 size-full" src="https://www.learntoplaymusic.com/blog/wp-content/uploads/2014/09/48_04.png" alt="Piano Tips for improving piano hand coordination: Changing Lanes 4" width="955" height="310" /></a></p> <p>&nbsp;</p> <h3><strong>Who is LearnToPlayMusic.com</strong></h3> <p><a href="https://www.learntoplaymusic.com" target="_blank">LearnToPlayMusic.com</a> is the world’s leading music education innovator and publisher of print, eBooks, apps and online lessons.</p> <p>&#8211; Continue learning with Learn To Play Music at <a href="https://www.learntoplaymusic.com" target="_blank">LearnToPlayMusic.com</a></p> <p>The post <a rel="nofollow" href="https://www.learntoplaymusic.com/blog/piano-tips-improving-piano-hand-coordination/">Piano Tips: Improving Piano Hand Coordination</a> appeared first on <a rel="nofollow" href="https://www.learntoplaymusic.com/blog">Learn To Play Music Blog</a>.</p> ]]>
</content:encoded>
<wfw:commentRss>https://www.learntoplaymusic.com/blog/piano-tips-improving-piano-hand-coordination/feed/</wfw:commentRss>
<slash:comments>8</slash:comments>
</item>
<item>
<title>Easy Guitar Songs for Beginners</title>
<link>https://www.learntoplaymusic.com/blog/free-easy-guitar-songs-beginners/</link>
<comments>https://www.learntoplaymusic.com/blog/free-easy-guitar-songs-beginners/#comments</comments>
<pubDate>Thu, 02 Oct 2014 00:30:43 +0000</pubDate>
<dc:creator>
<![CDATA[ LTP Editor ]]>
</dc:creator>
<category>
<![CDATA[ Guitar ]]>
</category>
<guid isPermaLink="false">https://www.learntoplaymusic.com/blog/?p=21938</guid>
<description>
<![CDATA[ <p>Guitar Songs for Beginners Today we thought we&#8217;d share with you some free and easy guitar songs for beginners. Throughout this post we&#8217;ve shared links to our other free blog posts, so if there&#8217;s any [&#8230;]</p> <p>The post <a rel="nofollow" href="https://www.learntoplaymusic.com/blog/free-easy-guitar-songs-beginners/">Easy Guitar Songs for Beginners</a> appeared first on <a rel="nofollow" href="https://www.learntoplaymusic.com/blog">Learn To Play Music Blog</a>.</p> ]]>
</description>
<content:encoded>
<![CDATA[ <h2><strong>Guitar Songs for Beginners</strong></h2> <p>Today we thought we&#8217;d share with you some free and easy guitar songs for beginners. Throughout this post we&#8217;ve shared links to our other free blog posts, so if there&#8217;s any technique, note or chord you don&#8217;t know you can still easily learn to play these songs. To play these guitar songs for beginners you should know:</p> <ul> <li><span style="color: #333399;"><strong><a href="https://www.learntoplaymusic.com/blog/?p=6423" target="_blank"><span style="color: #333399;">How to Hold a Guitar</span></a></strong></span></li> <li><span style="color: #333399;"><strong><a href="https://www.learntoplaymusic.com/blog/?p=6425" target="_blank"><span style="color: #333399;">How to Hold a Guitar Pick</span></a></strong></span></li> <li><span style="color: #333399;"><strong><a href="https://www.learntoplaymusic.com/blog/?p=20893" target="_blank"><span style="color: #333399;">How to Tune a Guitar</span></a></strong></span></li> <li><span style="color: #333399;"><strong><a href="https://www.learntoplaymusic.com/blog/?p=6443" target="_blank"><span style="color: #333399;">How to Read Guitar Chord Diagrams</span></a></strong></span></li> <li><strong><span style="color: #333399;"><a href="https://www.learntoplaymusic.com/blog/?p=6448" target="_blank"><span style="color: #333399;">How to Read Guitar Tablature (or TABs)</span></a></span></strong> (If you don&#8217;t know how to read sheet music)</li> </ul> <h2><strong> Ode to Joy</strong></h2> <p class="p1">This guitar song for beginners is the melody to Beethoven’s 9th Symphony. Instead of writing the strumming above each measure of music, it is easier to write it as a Rhythm Pattern. This indicates which strumming pattern to use in each measure throughout the song. In measure 8 there are two chords in the measure. Each one receives two counts. Remember to use the slide finger when changing between the G and D7 chords. To play this beginner guitar song you will need to know:</p> <ul> <li><span style="color: #333399;"><strong><a href="https://www.learntoplaymusic.com/blog/?p=6453" target="_blank"><span style="color: #333399;">The G Major Guitar Chord</span></a></strong></span></li> <li><span style="color: #333399;"><strong><a href="https://www.learntoplaymusic.com/blog/?p=6454" target="_blank"><span style="color: #333399;">The D Seventh (D7) Guitar Chord</span></a></strong></span></li> <li><span style="color: #333399;"><strong><a href="https://www.learntoplaymusic.com/blog/?p=6495" target="_blank"><span style="color: #333399;">The Notes on the 2nd Guitar String</span></a></strong></span></li> <li><span style="color: #333399;"><strong><a href="https://www.learntoplaymusic.com/blog/?p=6496" target="_blank"><span style="color: #333399;">The Notes on the 3rd Guitar String</span></a></strong></span></li> </ul> <p style="text-align: center;"><a href="https://www.learntoplaymusic.com/blog/wp-content/uploads/2014/09/Guitar-Song-for-Beginners-Rhythm-Pattern-1.jpg"><img class="alignnone wp-image-22058 size-full" src="https://www.learntoplaymusic.com/blog/wp-content/uploads/2014/09/Guitar-Song-for-Beginners-Rhythm-Pattern-1.jpg" alt="Guitar Song for Beginners Rhythm Pattern 1" width="708" height="143" /></a></p> <p style="text-align: center;"><a href="https://www.learntoplaymusic.com/blog/wp-content/uploads/2014/09/Guitar-Songs-for-Beginners-Ode-to-Joy-1.jpg"><img class="alignnone wp-image-21951 size-full" src="https://www.learntoplaymusic.com/blog/wp-content/uploads/2014/09/Guitar-Songs-for-Beginners-Ode-to-Joy-1.jpg" alt="Guitar Songs for Beginners - Ode to Joy 1" width="709" height="176" /></a></p> <p style="text-align: center;"><a href="https://www.learntoplaymusic.com/blog/wp-content/uploads/2014/09/Guitar-Songs-for-Beginners-Ode-to-Joy-2.jpg"><img class="alignnone wp-image-21953 size-full" src="https://www.learntoplaymusic.com/blog/wp-content/uploads/2014/09/Guitar-Songs-for-Beginners-Ode-to-Joy-2.jpg" alt="Guitar Songs for Beginners - Ode to Joy 2" width="709" height="171" /></a></p> <h2><strong>Aura Lee</strong></h2> <p class="p1">The easy guitar song, Aura Lee, contains quarter and half rests. Remember to count as you play to help you keep time. To play this beginner guitar song you will need to know:</p> <ul> <li><span style="color: #333399;"><strong><a href="https://www.learntoplaymusic.com/blog/?p=6455" target="_blank"><span style="color: #333399;">The C Major Guitar Chord</span></a></strong></span></li> <li><span style="color: #333399;"><strong><a href="https://www.learntoplaymusic.com/blog/?p=6474" target="_blank"><span style="color: #333399;">The G Seventh (G7) Guitar Chord</span></a></strong></span></li> </ul> <p style="text-align: center;"><a href="https://www.learntoplaymusic.com/blog/wp-content/uploads/2014/09/Guitar-Song-for-Beginners-Rhythm-Pattern-2.jpg"><img class="alignnone wp-image-22059 size-full" src="https://www.learntoplaymusic.com/blog/wp-content/uploads/2014/09/Guitar-Song-for-Beginners-Rhythm-Pattern-2.jpg" alt="Guitar Song for Beginners Rhythm Pattern 2" width="708" height="110" /></a></p> <p style="text-align: center;"><a href="https://www.learntoplaymusic.com/blog/wp-content/uploads/2014/09/Guitar-Songs-for-Beginners-Aura-Lee-1.jpg"><img class="alignnone wp-image-21946 size-full" src="https://www.learntoplaymusic.com/blog/wp-content/uploads/2014/09/Guitar-Songs-for-Beginners-Aura-Lee-1.jpg" alt="Guitar Songs for Beginners - Aura Lee 1" width="708" height="177" /></a></p> <p style="text-align: center;"><a href="https://www.learntoplaymusic.com/blog/wp-content/uploads/2014/09/Guitar-Songs-for-Beginners-Aura-Lee-2.jpg"><img class="alignnone wp-image-21947 size-full" src="https://www.learntoplaymusic.com/blog/wp-content/uploads/2014/09/Guitar-Songs-for-Beginners-Aura-Lee-2.jpg" alt="Guitar Songs for Beginners - Aura Lee 2" width="709" height="178" /></a></p> <h2><strong>Rock Riff #1</strong></h2> <p class="p1">This easy guitar riff is a pattern of notes that are repeated. The following example contains a two-measure riff played twice. The example is then repeated and ended by a whole note (semibreve). To play this beginner guitar song you will need to know:</p> <ul> <li><span style="color: #333399;"><strong><a href="https://www.learntoplaymusic.com/blog/?p=6478" target="_blank"><span style="color: #333399;">The Notes on the 1st Guitar String</span></a></strong></span></li> </ul> <p style="text-align: center;"><a href="https://www.learntoplaymusic.com/blog/wp-content/uploads/2014/09/Guitar-Song-for-Beginners-Rhythm-Pattern-2.jpg"><img class="alignnone wp-image-22059 size-full" src="https://www.learntoplaymusic.com/blog/wp-content/uploads/2014/09/Guitar-Song-for-Beginners-Rhythm-Pattern-2.jpg" alt="Guitar Song for Beginners Rhythm Pattern 2" width="708" height="110" /></a></p> <p style="text-align: center;"><a href="https://www.learntoplaymusic.com/blog/wp-content/uploads/2014/09/Guitar-Songs-for-Beginners-Rock-Riff-1.jpg"><img class="alignnone wp-image-21955 size-full" src="https://www.learntoplaymusic.com/blog/wp-content/uploads/2014/09/Guitar-Songs-for-Beginners-Rock-Riff-1.jpg" alt="Guitar Songs for Beginners - Rock Riff 1" width="709" height="174" /></a></p> <h2><strong>Marianne</strong></h2> <p class="p1">The easy guitar song Marianne is a Caribbean folk song. It contains a whole rest in measures 4, 8, 12 and 16, and uses only the chords and notes you have learned so far.</p> <p class="p1" style="text-align: center;"><a href="https://www.learntoplaymusic.com/blog/wp-content/uploads/2014/09/Guitar-Songs-for-Beginners-Marianne-1.jpg"><img class="alignnone wp-image-21948 size-full" src="https://www.learntoplaymusic.com/blog/wp-content/uploads/2014/09/Guitar-Songs-for-Beginners-Marianne-1.jpg" alt="Guitar Songs for Beginners - Marianne 1" width="709" height="172" /></a></p> <p class="p1" style="text-align: center;"><a href="https://www.learntoplaymusic.com/blog/wp-content/uploads/2014/09/Guitar-Songs-for-Beginners-Marianne-3.jpg"><img class="alignnone wp-image-21950 size-full" src="https://www.learntoplaymusic.com/blog/wp-content/uploads/2014/09/Guitar-Songs-for-Beginners-Marianne-3.jpg" alt="Guitar Songs for Beginners - Marianne 3" width="709" height="172" /></a></p> <p class="p1" style="text-align: center;"><a href="https://www.learntoplaymusic.com/blog/wp-content/uploads/2014/09/Guitar-Songs-for-Beginners-Marianne-2.jpg"><img class="alignnone wp-image-21949 size-full" src="https://www.learntoplaymusic.com/blog/wp-content/uploads/2014/09/Guitar-Songs-for-Beginners-Marianne-2.jpg" alt="Guitar Songs for Beginners - Marianne 2" width="709" height="173" /></a></p> <h2><strong>Rock Riff #2</strong></h2> <p class="p1"><span class="s1">Play the following easy guitar rock riff using alternate picking. </span>In alternate picking, use a down pick on the beat<em> (the number count)</em> and an up pick off the beat <em>(the ‘and’ count)</em>. This guitar song for beginners uses only the chords and notes you have learned so far.</p> <p class="p1" style="text-align: center;"><a href="https://www.learntoplaymusic.com/blog/wp-content/uploads/2014/09/Guitar-Song-for-Beginners-Rhythm-Pattern-3.jpg"><img class="alignnone wp-image-22060 size-full" src="https://www.learntoplaymusic.com/blog/wp-content/uploads/2014/09/Guitar-Song-for-Beginners-Rhythm-Pattern-3.jpg" alt="Guitar Song for Beginners Rhythm Pattern 3" width="708" height="110" /></a></p> <p class="p1" style="text-align: center;"><a href="https://www.learntoplaymusic.com/blog/wp-content/uploads/2014/09/Guitar-Songs-for-Beginners-Rock-Riff-2.jpg"><img class="alignnone wp-image-21956 size-full" src="https://www.learntoplaymusic.com/blog/wp-content/uploads/2014/09/Guitar-Songs-for-Beginners-Rock-Riff-2.jpg" alt="Guitar Songs for Beginners - Rock Riff 2" width="709" height="175" /></a></p> <p class="p1">You can continue to learn guitar songs for beginners using our <span style="color: #333399;"><strong><a href="/blog/music-lessons/guitar/beginner-guitar/" target="_blank"><span style="color: #333399;">free online guitar lessons</span></a></strong></span>, which expands greatly on this post. For even more guitar music lessons, why not check out one of our most popular guitar lesson books: <span style="color: #333399;"><strong><a href="http://redirect.learntoplaymusic.com/redirect.html?SOURCE=BLG&amp;amp;B_CO=69163" target="_blank"><span style="color: #333399;">Progressive Beginner Guitar</span></a></strong></span>.</p> <p class="p1">&#8211; Thanks for learning with us today. You can continue learning with us at <span style="color: #333399;"><strong><a href="https://www.learntoplaymusic.com" target="_blank"><span style="color: #333399;">LearnToPlayMusic.com</span></a></strong></span>.</p> <p>The post <a rel="nofollow" href="https://www.learntoplaymusic.com/blog/free-easy-guitar-songs-beginners/">Easy Guitar Songs for Beginners</a> appeared first on <a rel="nofollow" href="https://www.learntoplaymusic.com/blog">Learn To Play Music Blog</a>.</p> ]]>
</content:encoded>
<wfw:commentRss>https://www.learntoplaymusic.com/blog/free-easy-guitar-songs-beginners/feed/</wfw:commentRss>
<slash:comments>25</slash:comments>
</item>
</channel>
</rss>
<!-- Performance optimized by W3 Total Cache. Learn more: https://www.w3-edge.com/products/ Served from: www.learntoplaymusic.com @ 2024-11-25 16:15:59 by W3 Total Cache -->